Good day! everyone, for this article I wanna show you How To Create a Login Page in ASP.net MVC with a Database in a step-by-step process.
So just follow the steps given below to complete the tutorial on how to Create a Login Page in ASP.net.
What is a Login Page in ASP.net?
The Login Page in ASP.net is a web page or website entry page that requires user identification and authentication, which is often accomplished by providing a username and password combination.
Logins might give you access to the full site or just a section of it.
Logging in allows the website to track the user’s activity and habits in addition to providing site access.
The user can log off a webpage or site manually, or it can happen automatically when specified criteria (such as closing the page, turning off the computer, or waiting a long period) are met.
What is the difference between login and user in SQL Server?
- SQL login is specific to the database server, and SQL Server database user is set for individual SQL Server Database if the SQL Server login is the Windows system account.
- SQL Server login account differs from a Database user in that it is the login user for a SQL Server database. If you have multiple databases, each database user has their own SQL Server login. At the same time, one or a few login users are restricted to a single database user.
So far, we’ve learned that SQL Server login is linked to the database user and that the two are distinct.
To connect to SQL Server, you’ll need an SQL Server login, and you’ll need a database user to access a specific database.
We could only log into SQL Server and access a certain database if we logged in as both SQL Server and database user at the same time.
The username and password in a static login form are fixed and predefined by the programmer, however in a dynamic login form, the username and password match the database username and password, and multiple users can log in with this dynamic login form.
Create a database table for username and password before creating a dynamic login form in asp.net. We’ve made a table called “LoginMst” that has three columns: ID, Username, and Password.
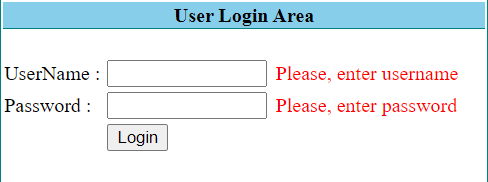
We first check if the username and password textboxes are blank in this asp.net login form example, then show the error message “Please input username” for the username textbox and “Please enter password” for the password textbox using the required field validator control in asp.net.
If the textbox is not empty, compare the username and password to database fields; if they match, display a success message such as “Welcome to System,” if they don’t, display an error message such as “Invalid username and password.”
Login Page in ASP.net Web Application: Project Details and Technology
| Project Title: | Login Page Project In ASP.net |
|---|---|
| Abstract : | Login Page in ASP.net A login page is a web page or website entry page that requires user identification and authentication. |
| Project Type: | Website |
| Technology : | ASP.Net Visual Studio 2022 with C# Language |
| Database : | SQL-Server 2021 |
Steps on How To Create a Login Page in ASP.net with Source Code
Time needed: 10 minutes
How To Create a Login Page in ASP.net with Source Code
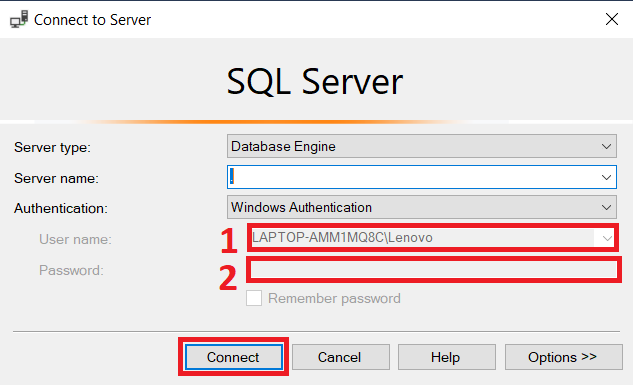
- Step 1: Open SQL Server
Open SQL Server (enter the Server Name, ID and Password then click on Connect).

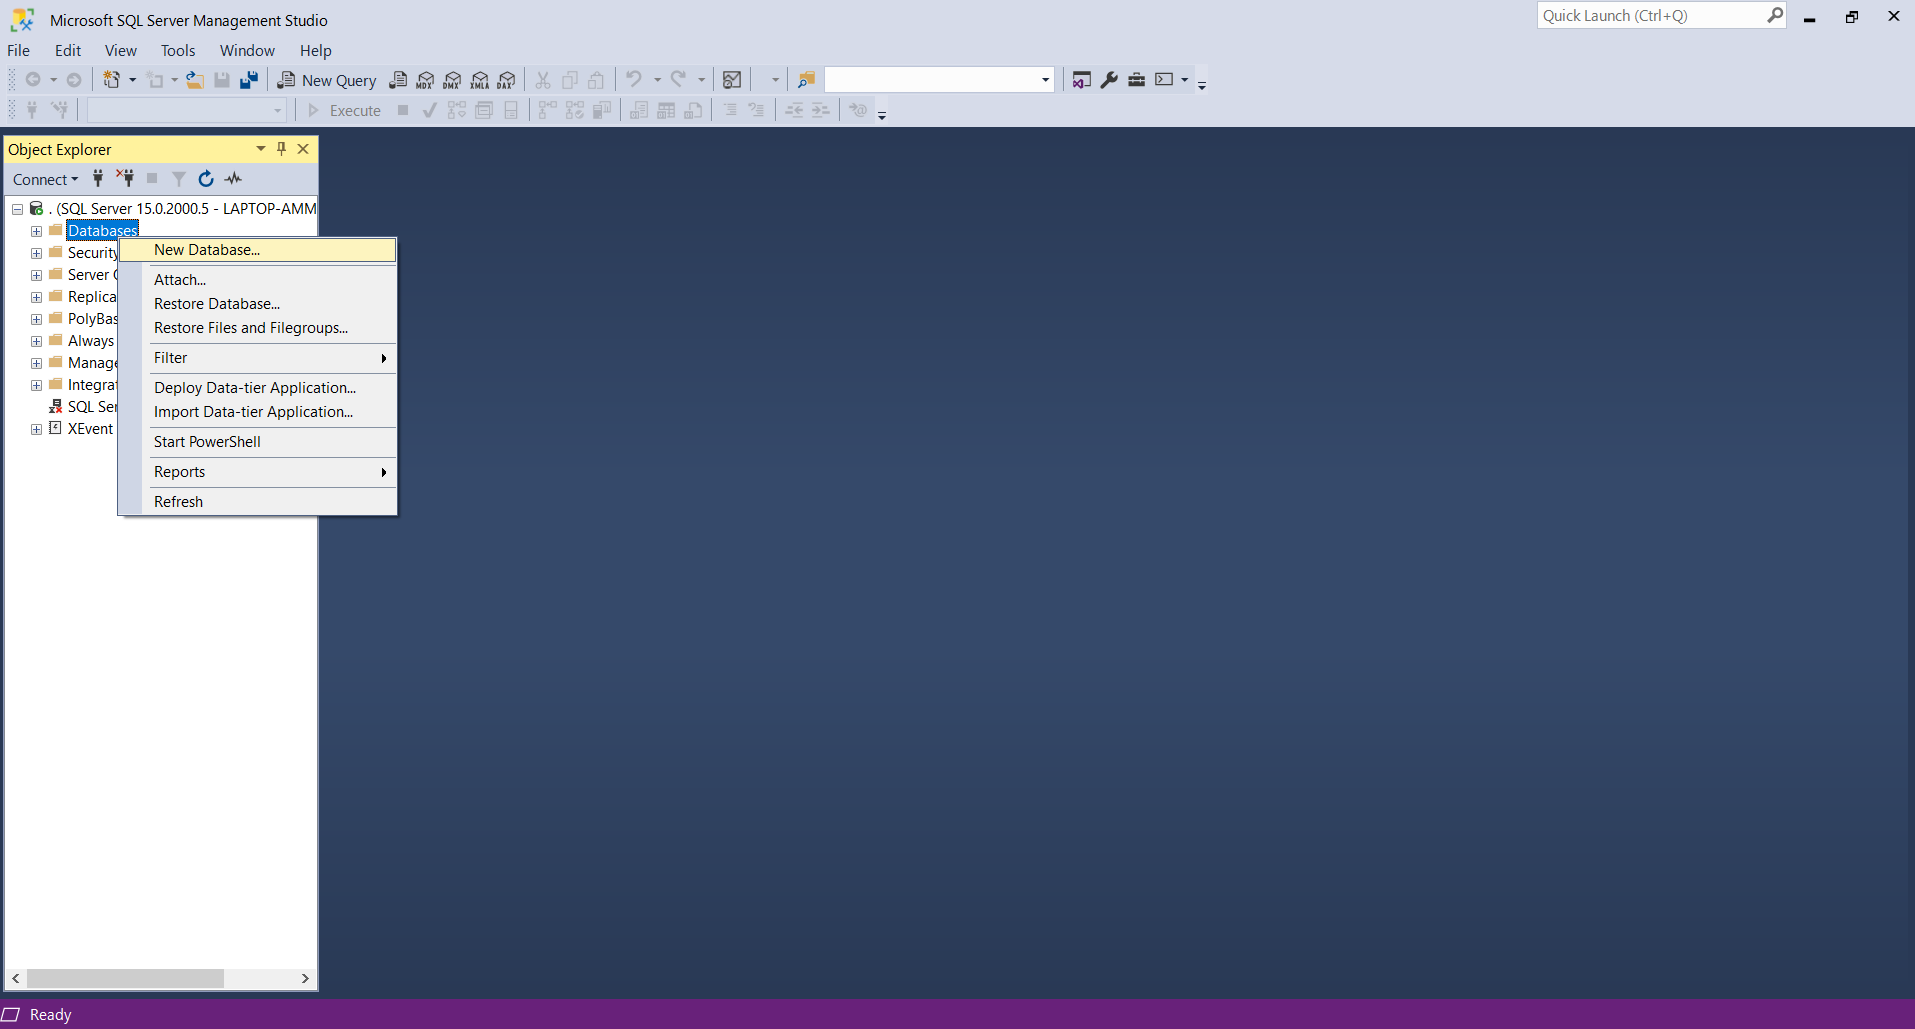
- Step 2: Create a new database
Create a new database (right-click on Database then select New Database).

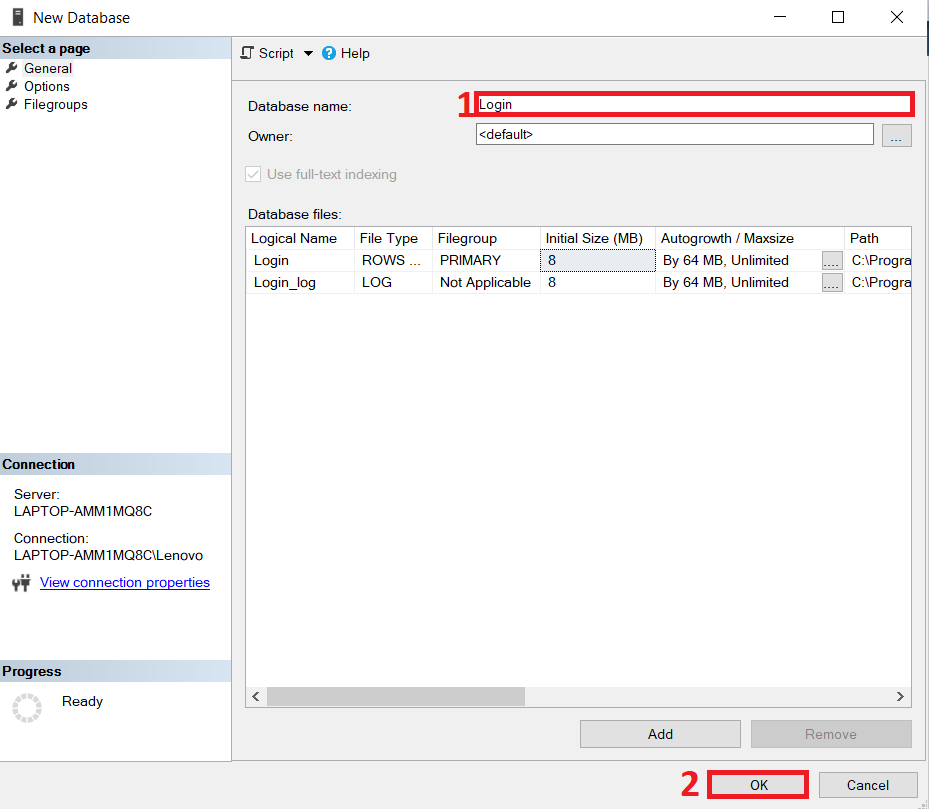
- Step 3: Name your database
Enter “Login” for the database name then click OK.

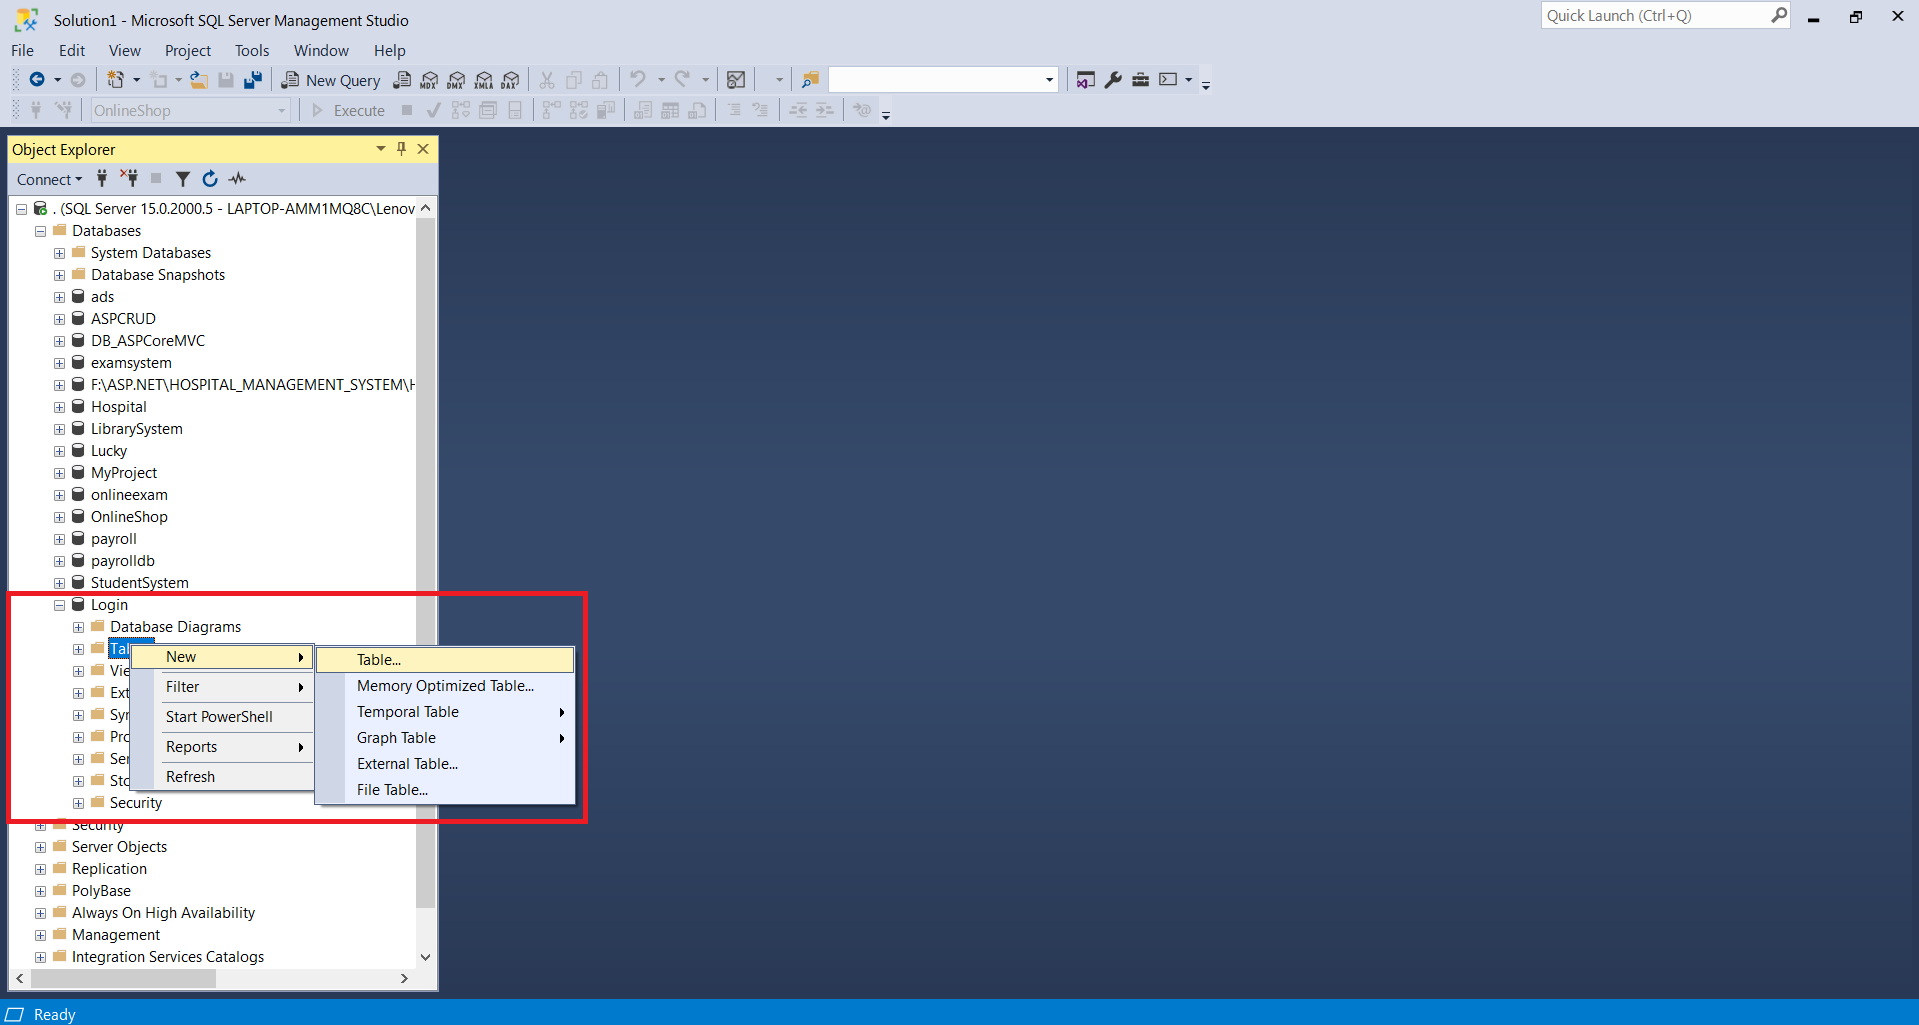
- Step 4: Create a new table
Create a new table (explore the login database then right-click on Tables then select New Table).

- Step 5: Design the table
Design the table (name the columns and set the data types as shown in the following figure).

- Step 6: Open Visual Studio
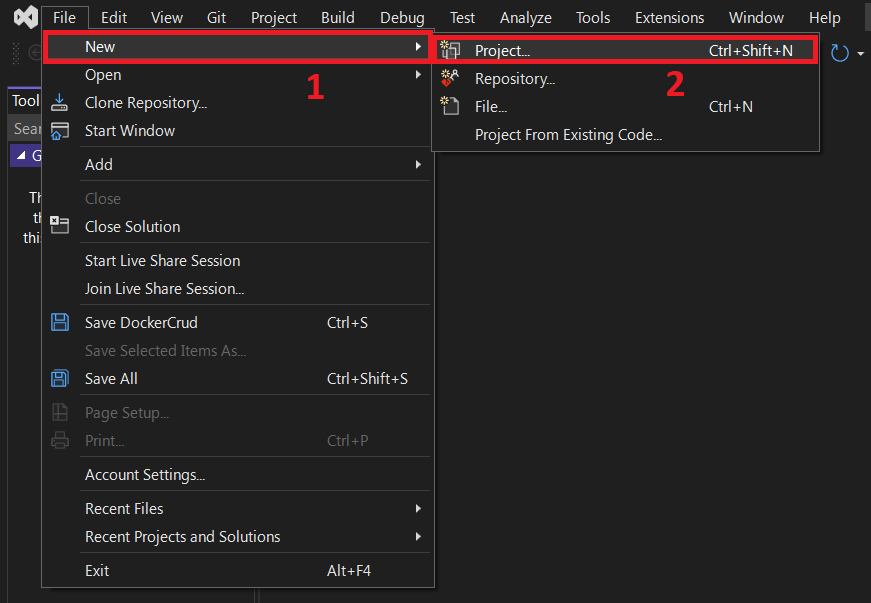
Create a New Web Application (open Visual Studio then select File -> New ->New Project).

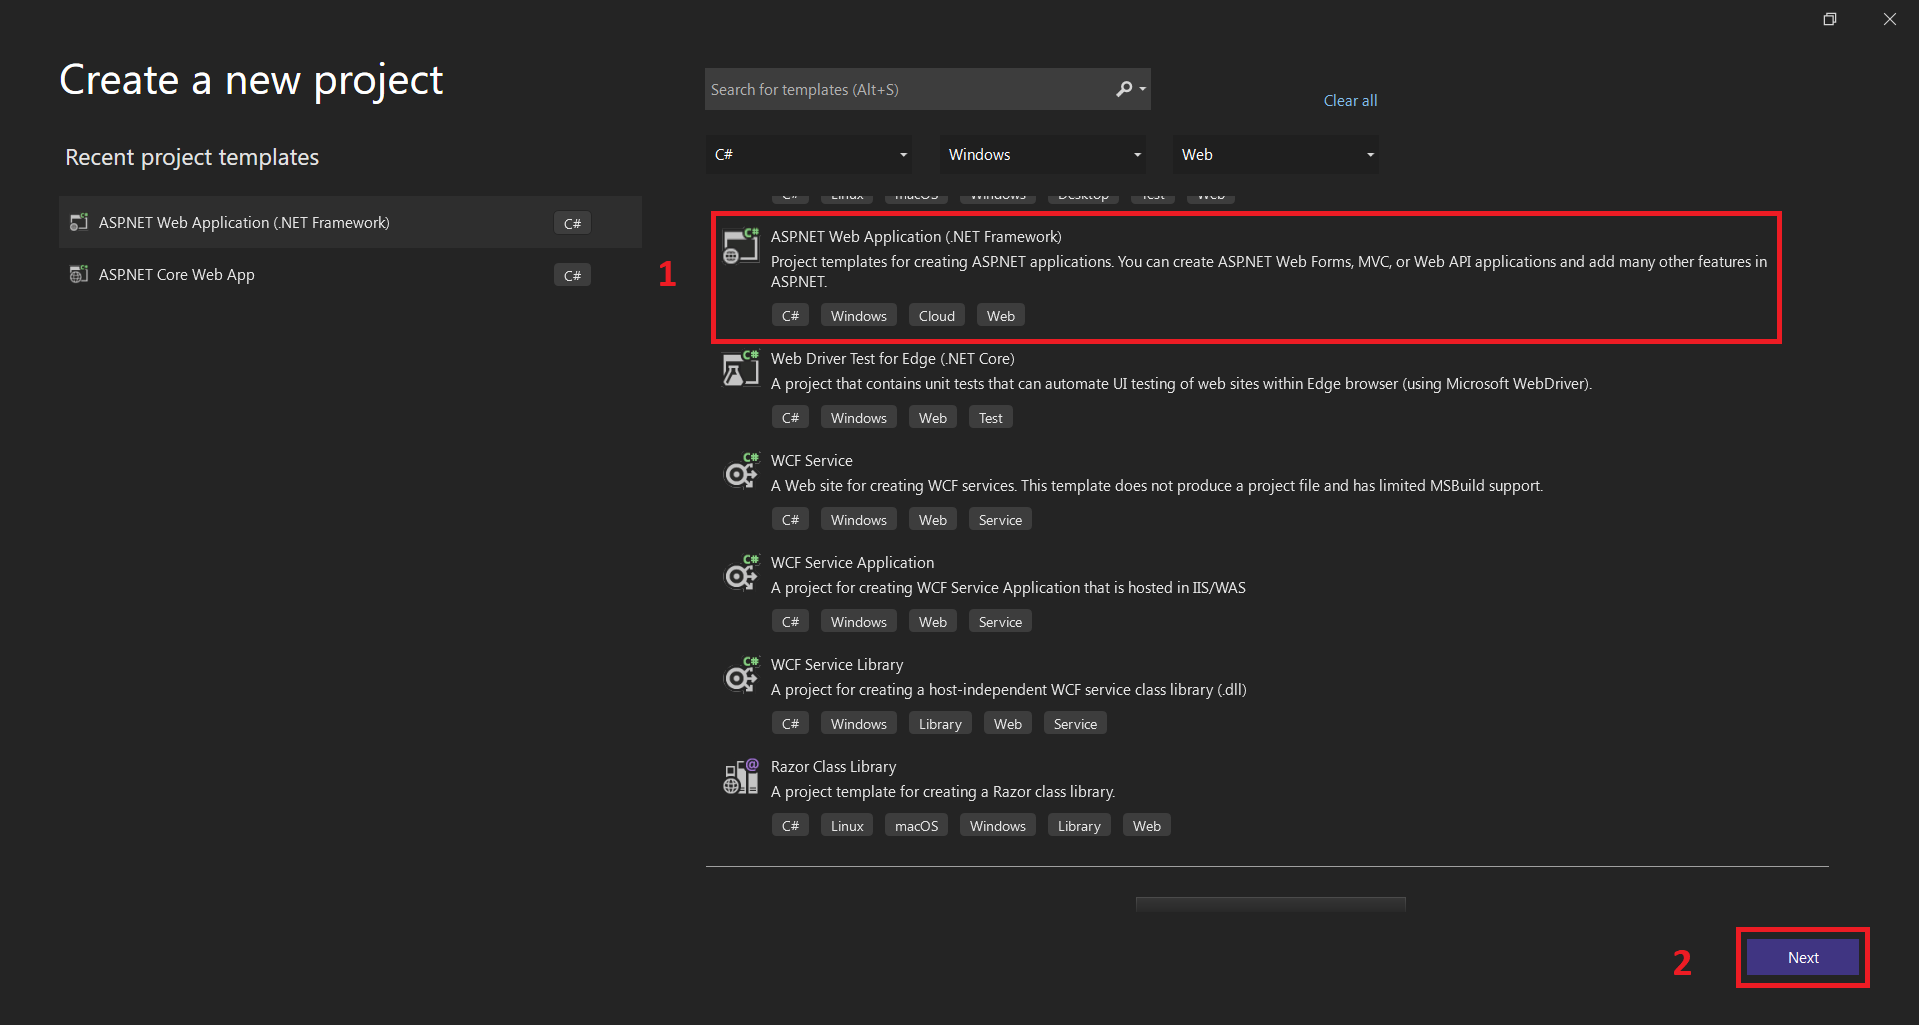
- Step 7: Select ASP.NET Web Application
Next, select ASP.NET Web Application(.NET Framework).

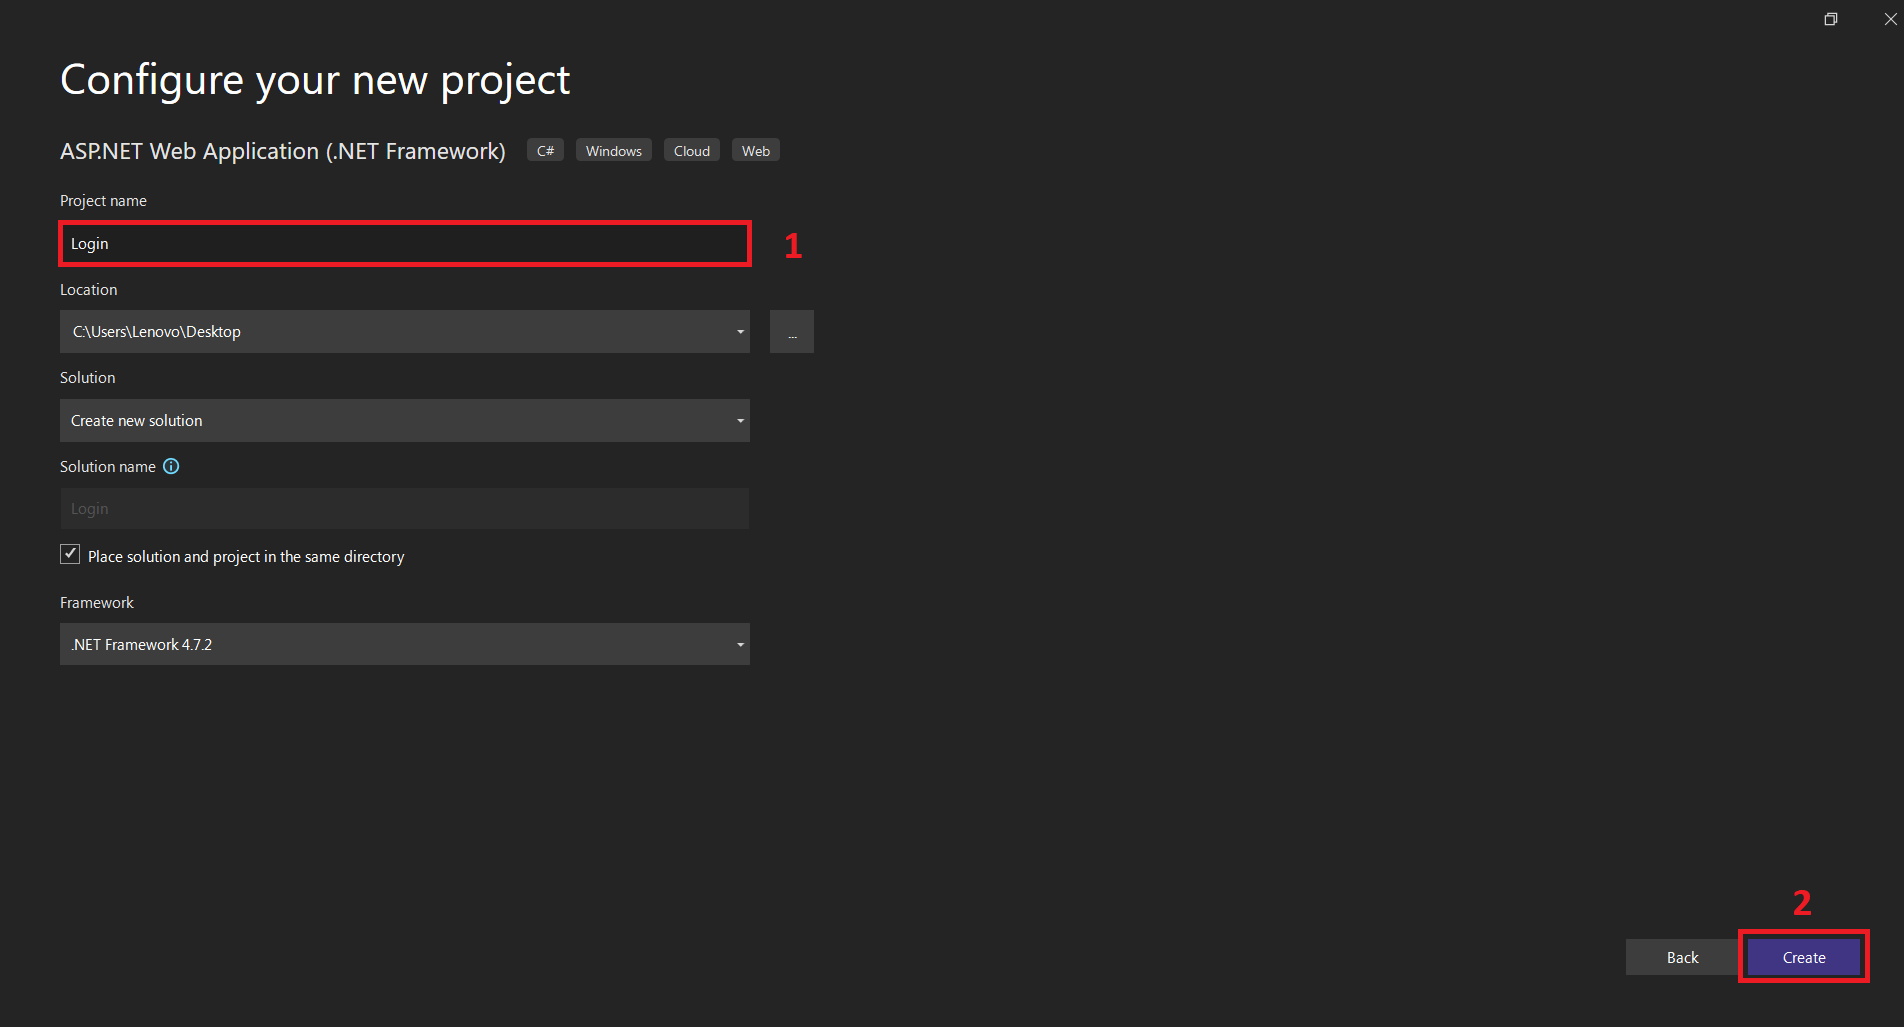
- Step 8: Name your project
Next, name your project and then, click Create button.

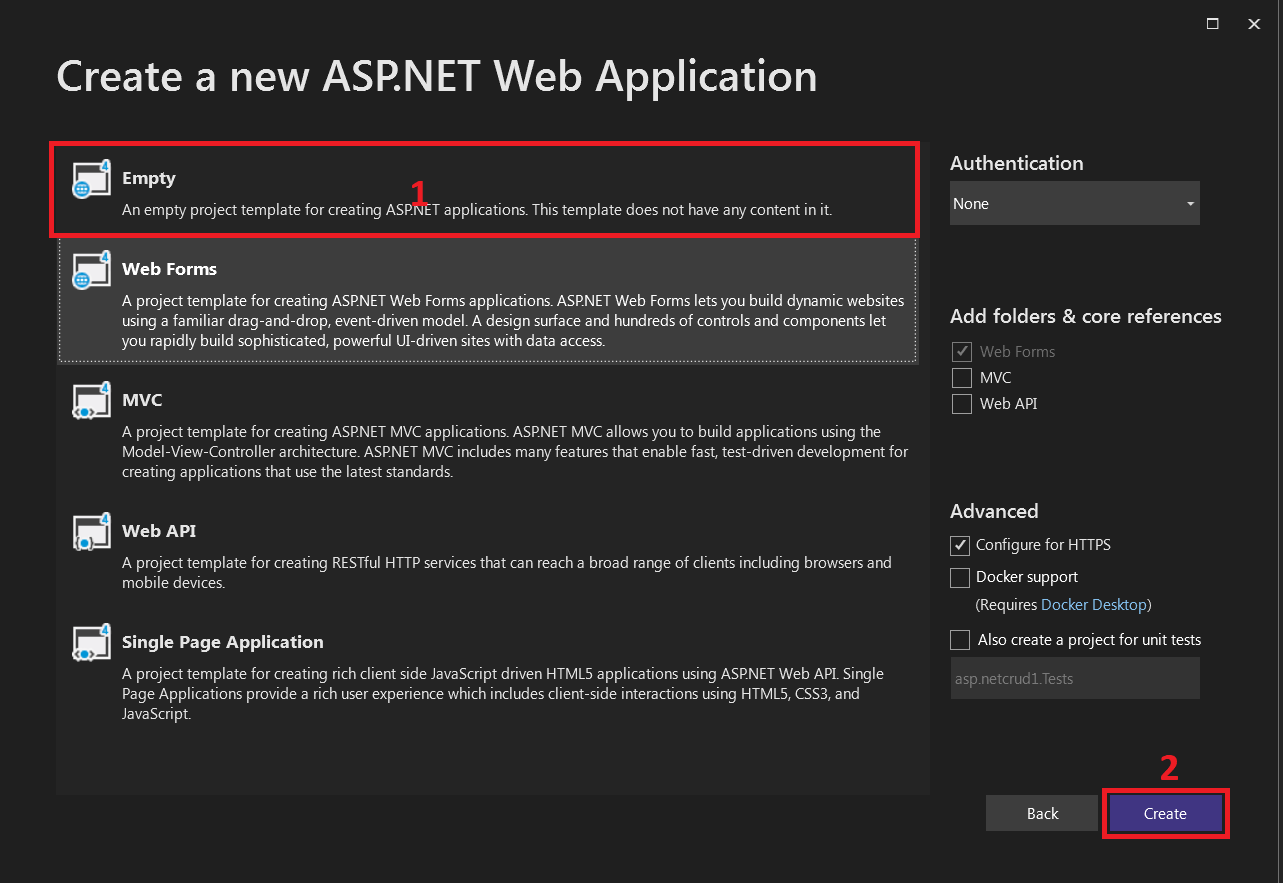
- Step 9: Select an empty project
Next, select empty project, then click create.

- Step 10: Add a new item
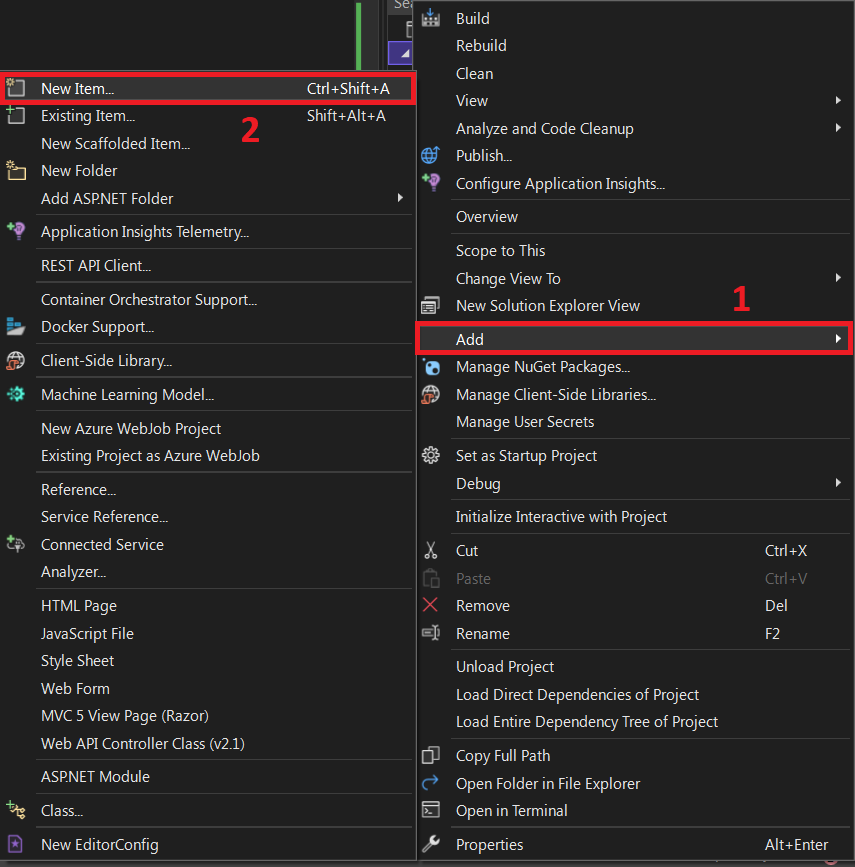
Next, right-click on your project name on the right side under Solution Explorer and click Add then new item.

- Step 11: Select the web form
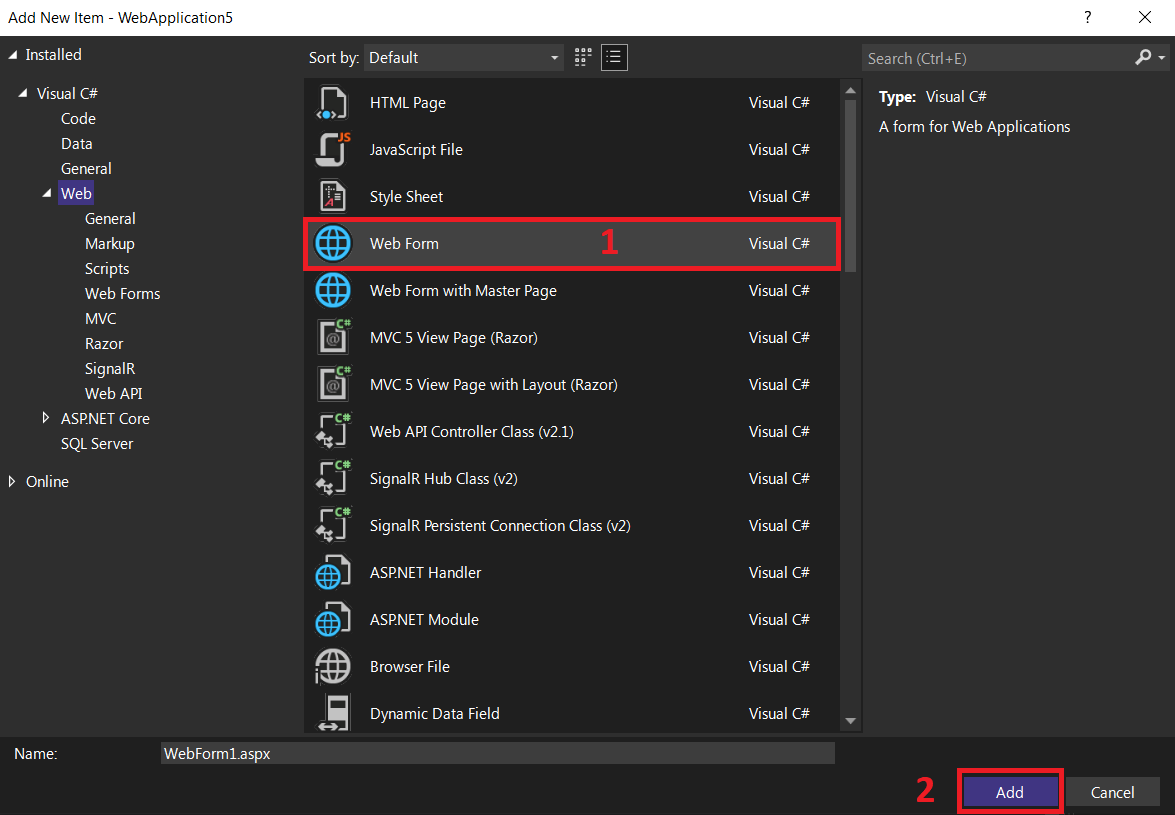
Next, select web form click add, and name your form “Login”

- Step 12: Add reference
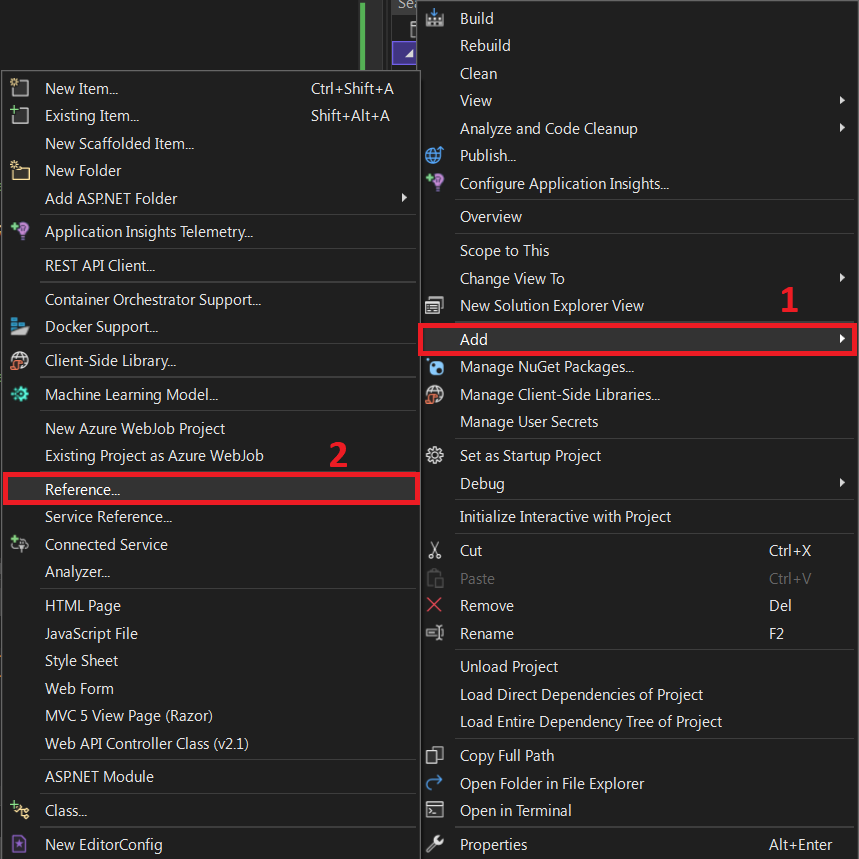
Next, right-click the project in the solution explorer then click Add the click reference.

- Step 13: Add mysql.data.dll
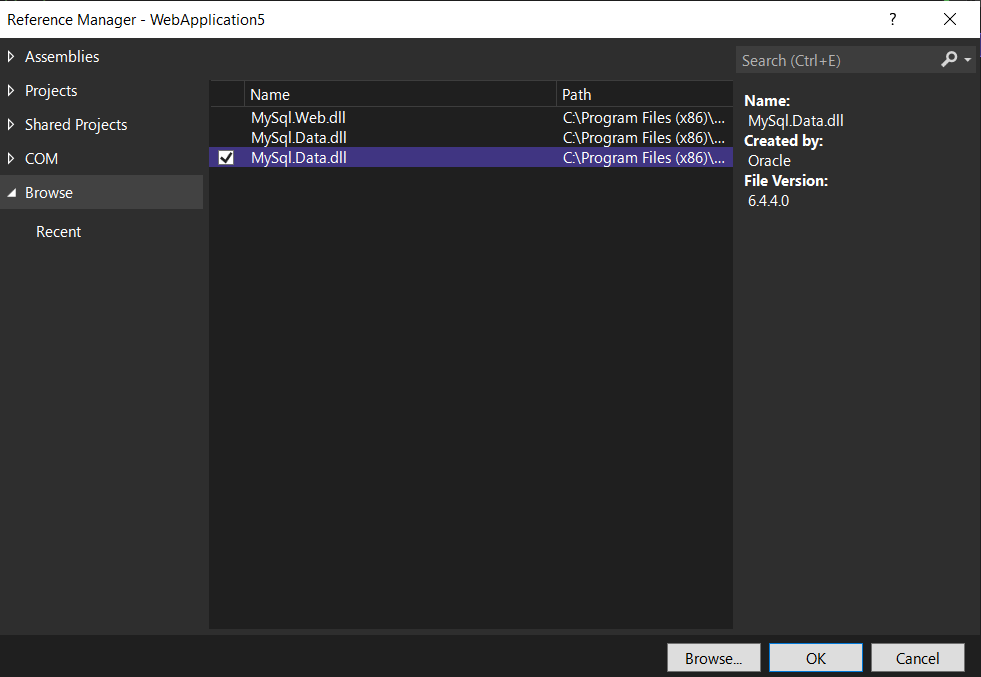
Next, add mysql.data.dll then click ok.

- Step 14: Copy the code given
Finally, copy all code given below and paste it to each designated file.
Here’s the code for Default.aspx file
<%@ Page Language="C#" AutoEventWireup="true" CodeFile="Default.aspx.cs" Inherits="_Default" %>
<!DOCTYPE html PUBLIC "-//W3C//DTD XHTML 1.0 Transitional//EN" "http://www.w3.org/TR/xhtml1/DTD/xhtml1-transitional.dtd">
<html xmlns="http://www.w3.org/1999/xhtml">
<head runat="server">
<title></title>
<style type="text/css">
.style1
{
width: 391px;
}
.style2
{
width: 131px;
}
.style3
{
width: 79px;
}
</style>
</head>
<body>
<form id="form1" runat="server">
<div>
<table align="center" class="style1" style="border: thin solid #008080">
<tr>
<td colspan="3"
style="text-align: center; font-weight: 700; border-bottom-style: solid; border-bottom-width: thin; border-bottom-color: #008080; background-color: skyblue">
User Login Area</td>
</tr>
<tr>
<td class="style3">
</td>
<td class="style2">
</td>
<td>
</td>
</tr>
<tr>
<td class="style3">
UserName :</td>
<td class="style2">
<asp:TextBox ID="txtusername" runat="server" Width="120px"></asp:TextBox>
</td>
<td>
<asp:RequiredFieldValidator ID="RequiredFieldValidator1" runat="server"
ControlToValidate="txtusername" ErrorMessage="Please, enter username"
ForeColor="Red"></asp:RequiredFieldValidator>
</td>
</tr>
<tr>
<td class="style3">
Password :</td>
<td class="style2">
<asp:TextBox ID="txtpassword" runat="server" TextMode="Password" Width="120px"></asp:TextBox>
</td>
<td>
<asp:RequiredFieldValidator ID="RequiredFieldValidator2" runat="server"
ControlToValidate="txtpassword" ErrorMessage="Please, enter password"
ForeColor="Red"></asp:RequiredFieldValidator>
</td>
</tr>
<tr>
<td class="style3">
</td>
<td class="style2">
<asp:Button ID="btnlogin" runat="server" onclick="btnlogin_Click"
Text="Login" />
</td>
<td>
</td>
</tr>
<tr>
<td class="style3">
</td>
<td colspan="2">
<asp:Label ID="lblmsg" runat="server"></asp:Label>
</td>
</tr>
</table>
</div>
</form>
</body>
</html>The code given above is the design of login page.
Here’s the code for Default.aspx.cs file
using System;
using System.Collections.Generic;
using System.Linq;
using System.Web;
using System.Web.UI;
using System.Web.UI.WebControls;
using System.Data;
using System.Data.SqlClient;


public partial class _Default : System.Web.UI.Page
{
    SqlConnection SQLConn = new SqlConnection("Data Source=LAPTOP-AMM1MQ8C; Initial Catalog=Login; Integrated Security=True");
    protected void Page_Load(object sender, EventArgs e)
    {

    }
    protected void btnlogin_Click(object sender, EventArgs e)
    {
        lblmsg.Text = "";
        SqlDataAdapter SQLAdapter = new SqlDataAdapter("Select * from LoginMst where username='" + txtusername.Text + "' and password='" + txtpassword.Text + "'", SQLConn);
        DataTable DT = new DataTable();
        SQLAdapter.Fill(DT);

        if (DT.Rows.Count > 0)
        {
            lblmsg.Text = "Welcome to System";
            lblmsg.ForeColor = System.Drawing.Color.Green;
        }

        else
        {
            lblmsg.Text = "Invalid username or password";
            lblmsg.ForeColor = System.Drawing.Color.Red;
        }
    }
}
The code given above is the back-end of login page.
Download Source Code below!
Conclusion
Using the .Net Framework 4.7.2 and a code generation tool, we learned how to develop an ASP.NET Web application and link it to a SQL Server to execute basic Login Form tasks.
I hope you found it beneficial. Please let us know what you think in the comments area below.
Related Articles
- Login Page In Python With Source Code
- Login Page In Laravel With Source Code
- Login Page In Codeigniter With Source Code
- Login Page In Javascript With Source Code
- Login Page Code In Java With Source Code
- Login And Registration System in Django With Source Code
- C++ Login System with Source Code
Inquiries
If you have any questions or suggestions about How To Create a Login Page in ASP.net with Source Code, please feel free to leave a comment below.

