
The CRUD Operation in ASP net is an acronym which stands for Create, Read, Update, and Delete. These are the four most basic operations that most traditional database systems can do, and they form the basis for working with any database.
Further, CRUD comes in since Application roles are added to the database using a stored procedure. It is also implemented by granting permission to execute the CRUD stored procedures and revoking direct access to the tables.
Project Details and Technology :
| Project Title: | CRUD Operation Project In ASP.NET |
|---|---|
| Abstract : | CRUD Operation in ASP NET is an abbreviation for Create, Read, Update, and Delete. |
| Project Type: | Website |
| Technology : | ASP.Net Visual Studio 2022 with C# Language |
| Database : | SQL-Server 2021 |
Steps on How To Create a CRUD Operation in ASP.net
Time needed: 10 minutes
CRUD Operation in ASP.net with Source Code
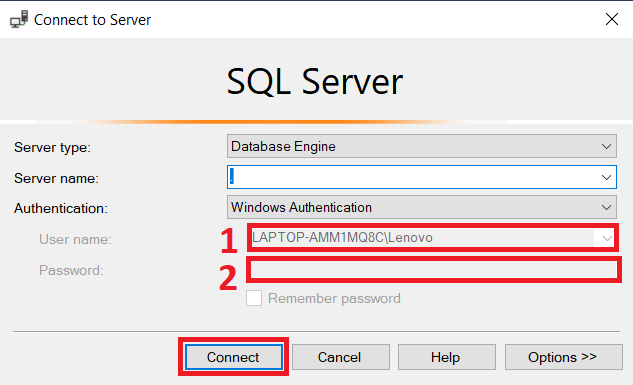
- Step 1: Open SQL Server
Open SQL Server (enter the Server Name, Id and Password then click on Connect).

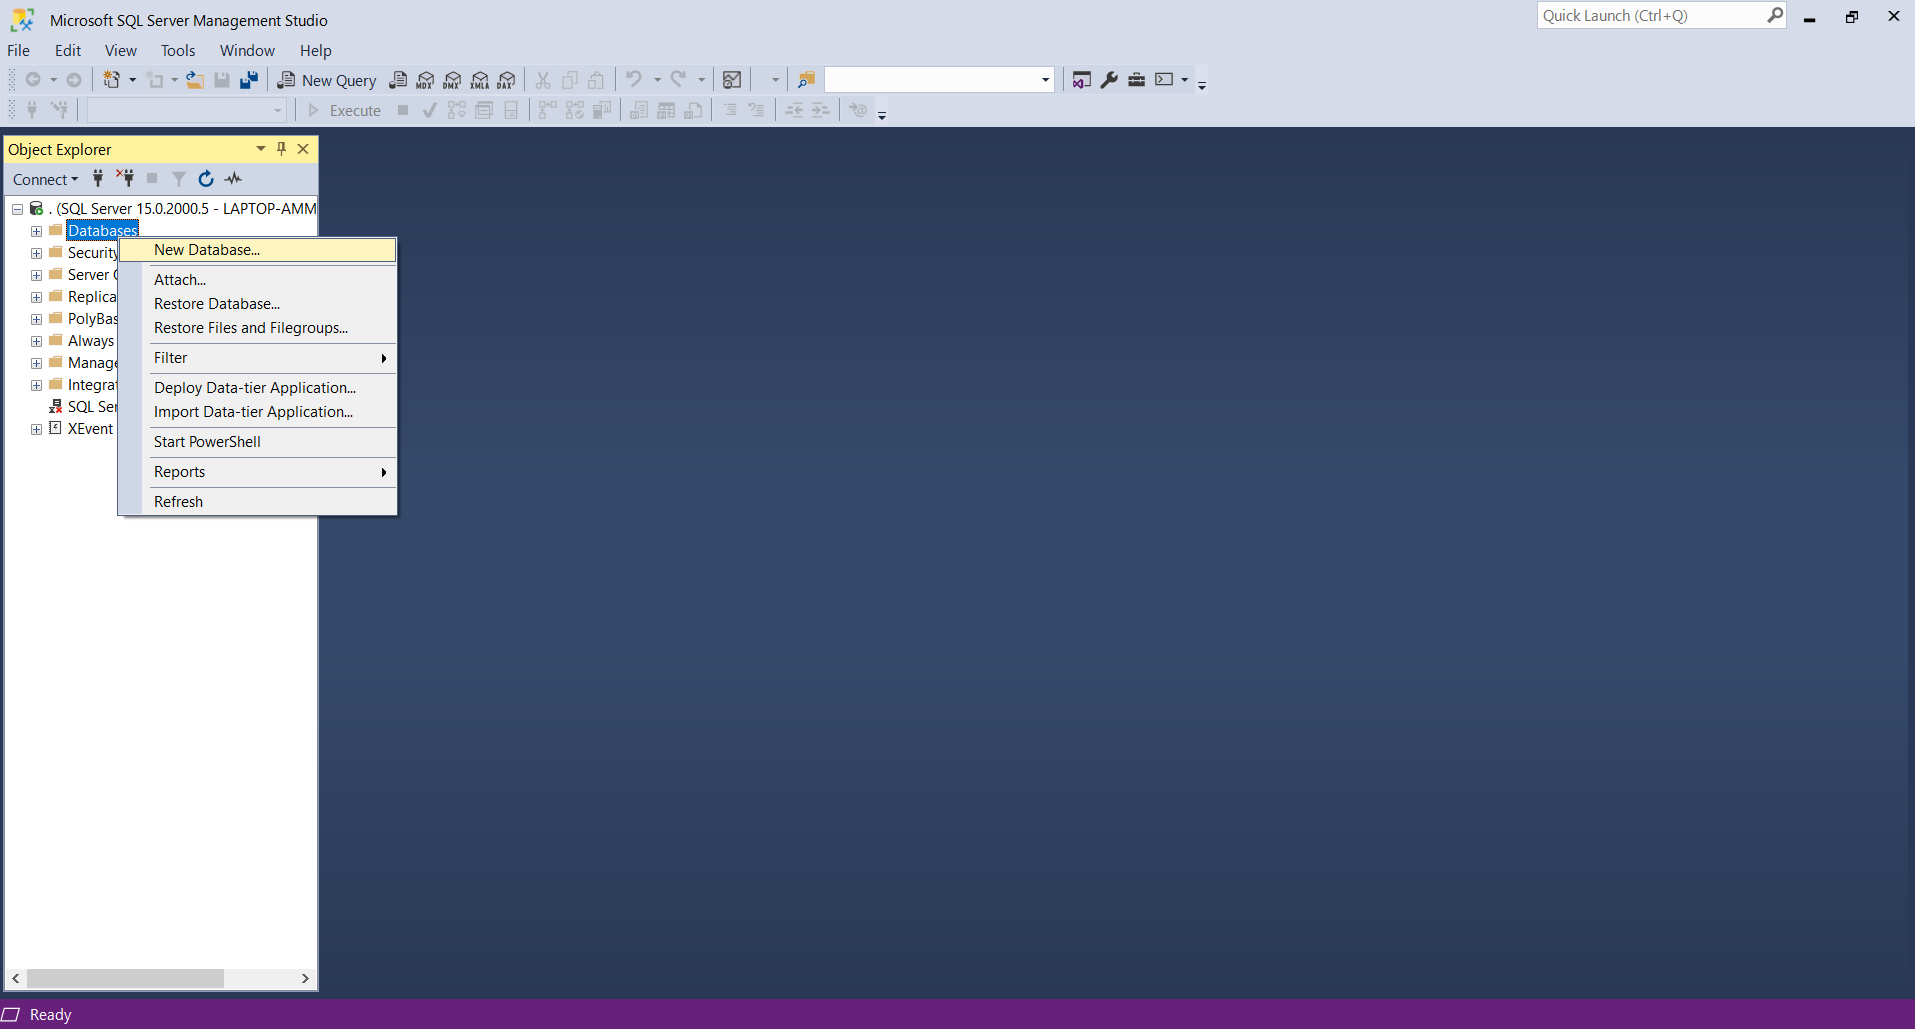
- Step 2: Create new database
Create a new database (right-click on Database then select New Database).

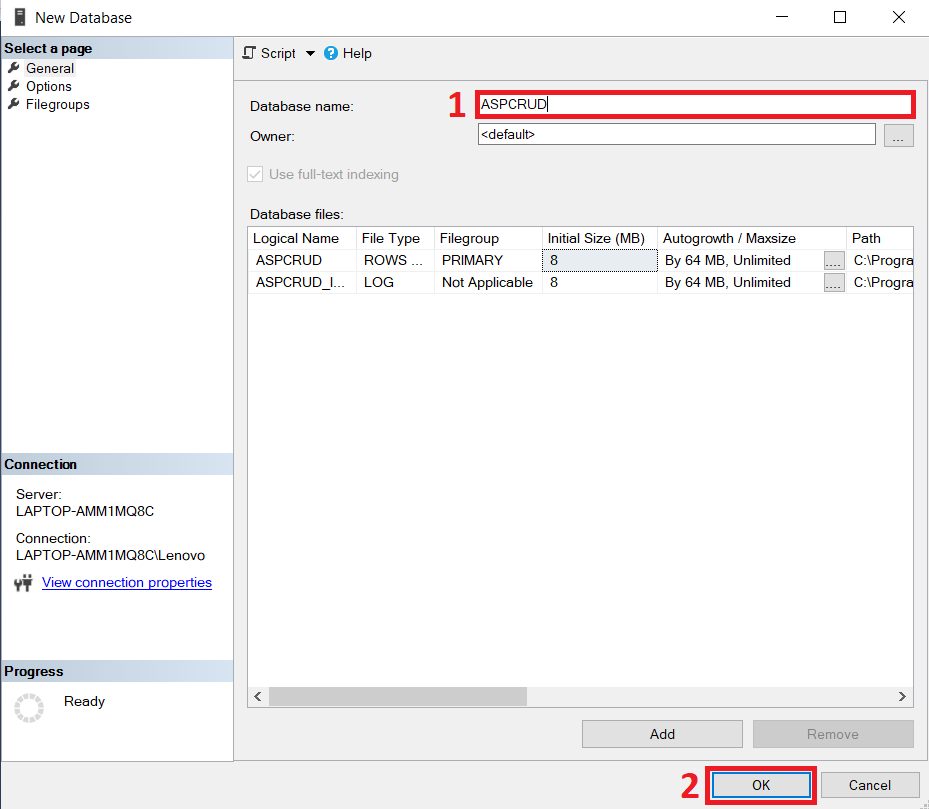
- Step 3: Name your database
Enter “ASPCRUD” for the database name then click OK.

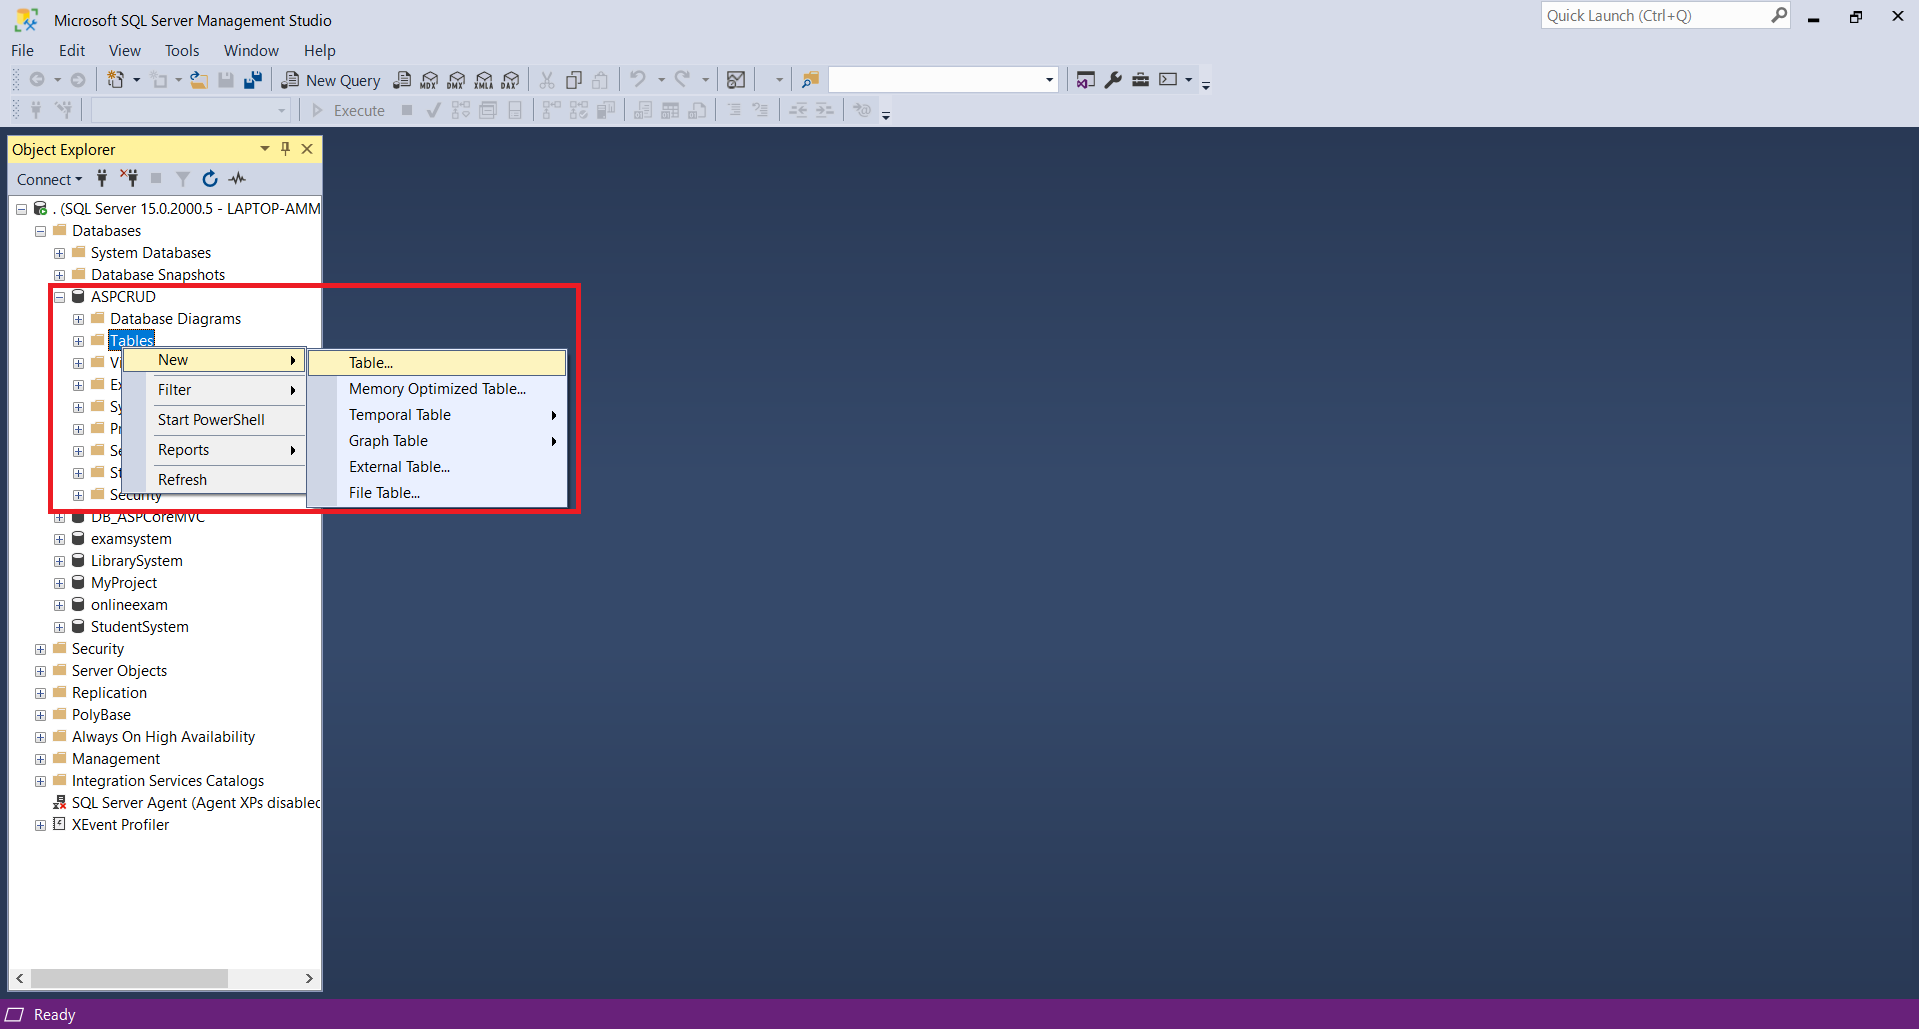
- Step 4: Create new table
Create a new table (explore the CRUD database then right-click on Tables then select New Table).

- Step 5: Design the table
Design the table (name the columns and set the data types as shown in the following figure).

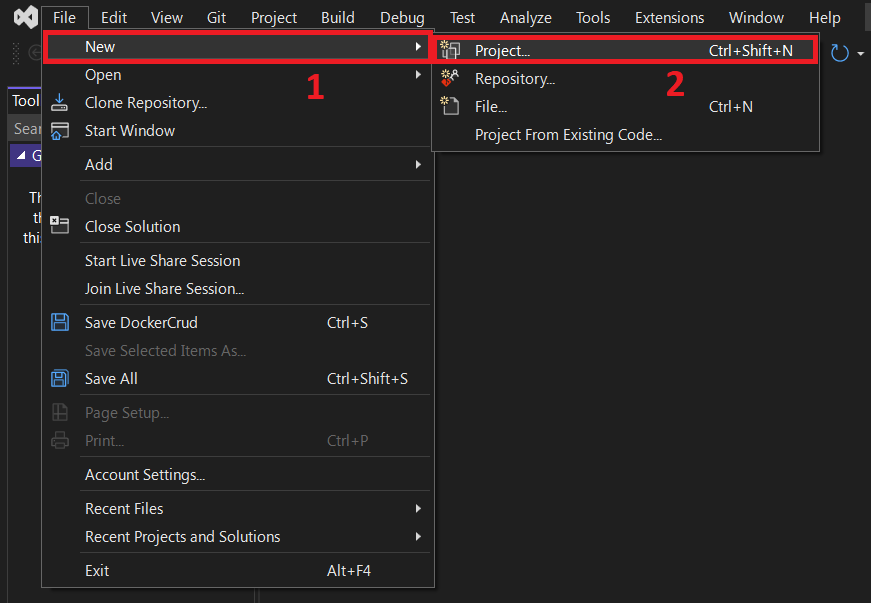
- Step 6: Open Visual Studio
Create a New Web Application (open Visual Studio then select File -> New ->New Project).

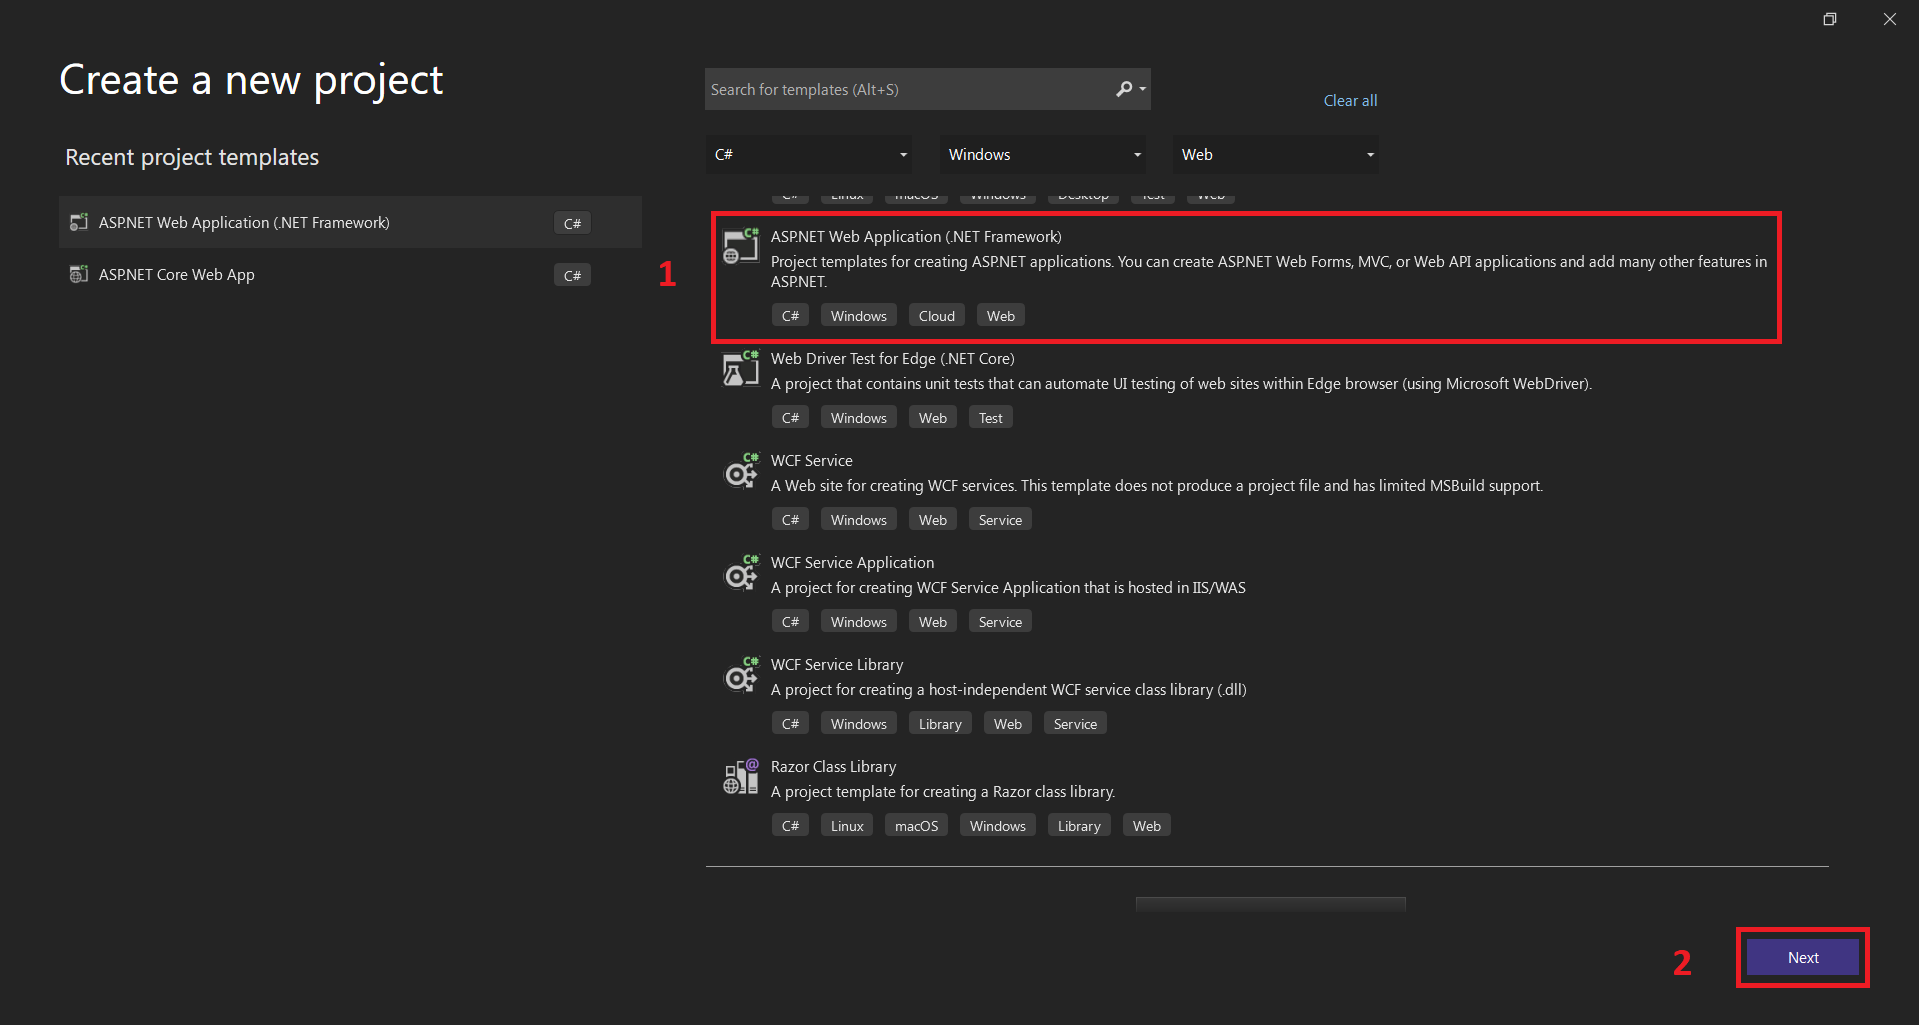
- Step 7: Select ASP.NET Web Application
Next, select ASP.NET Web Application(.NET Framework).

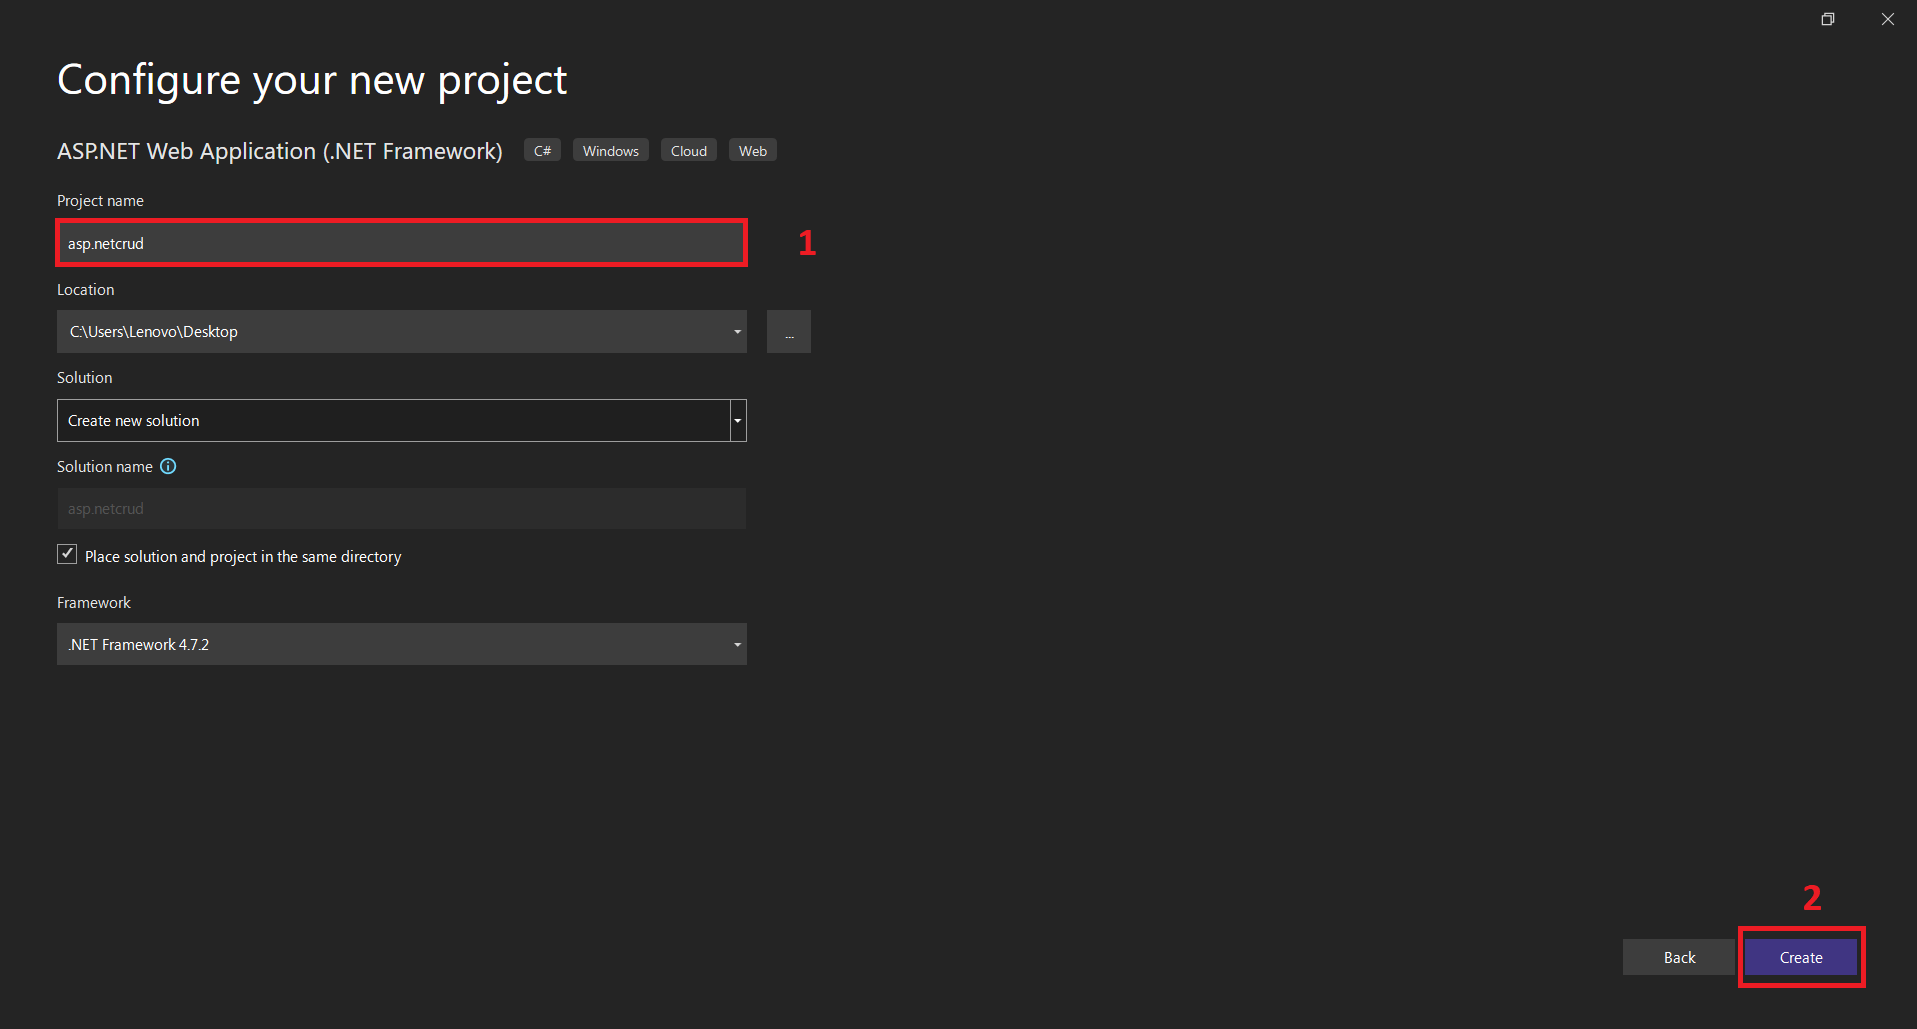
- Step 8: Name your project
Next, name your project and then, click create button.

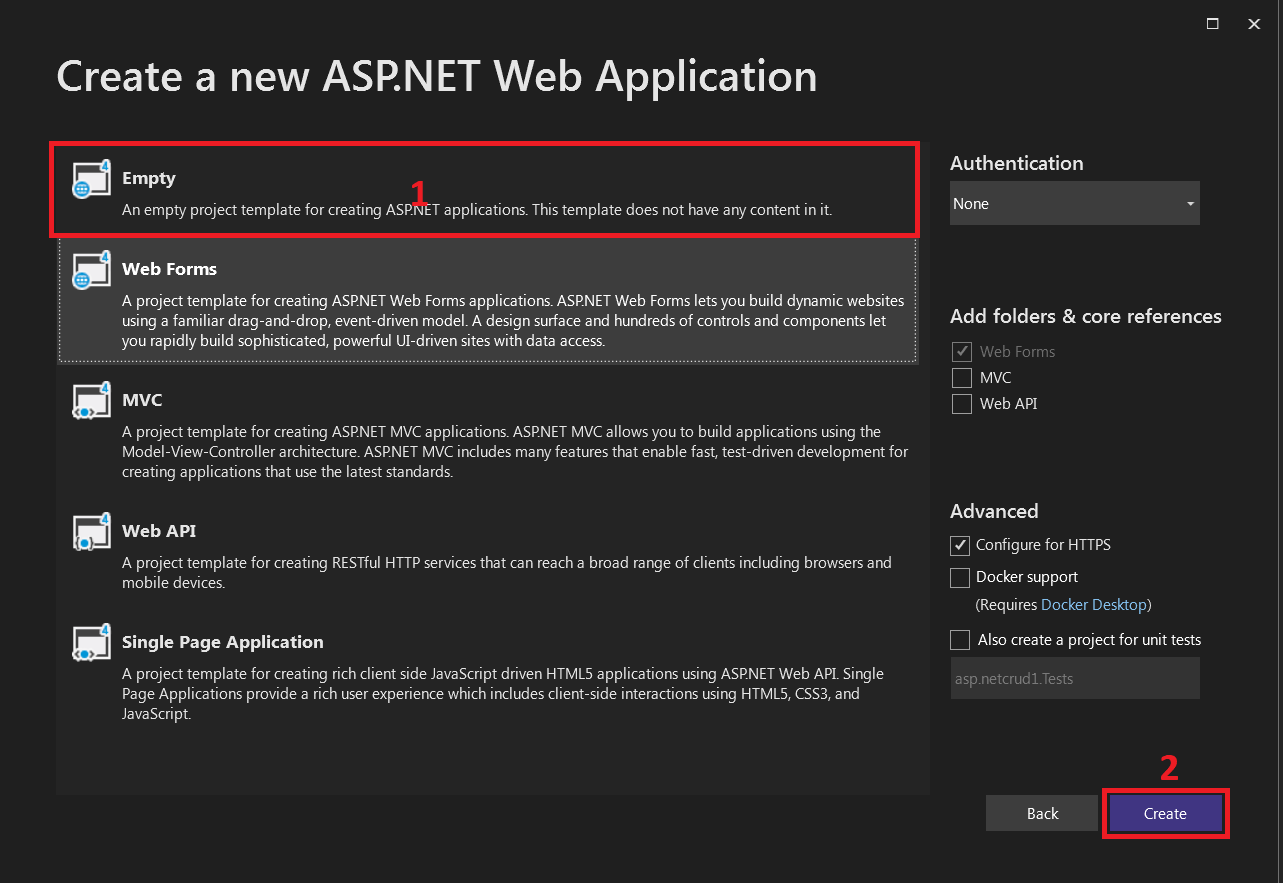
- Step 9: Select empty project
Next, select empty project, then click create.

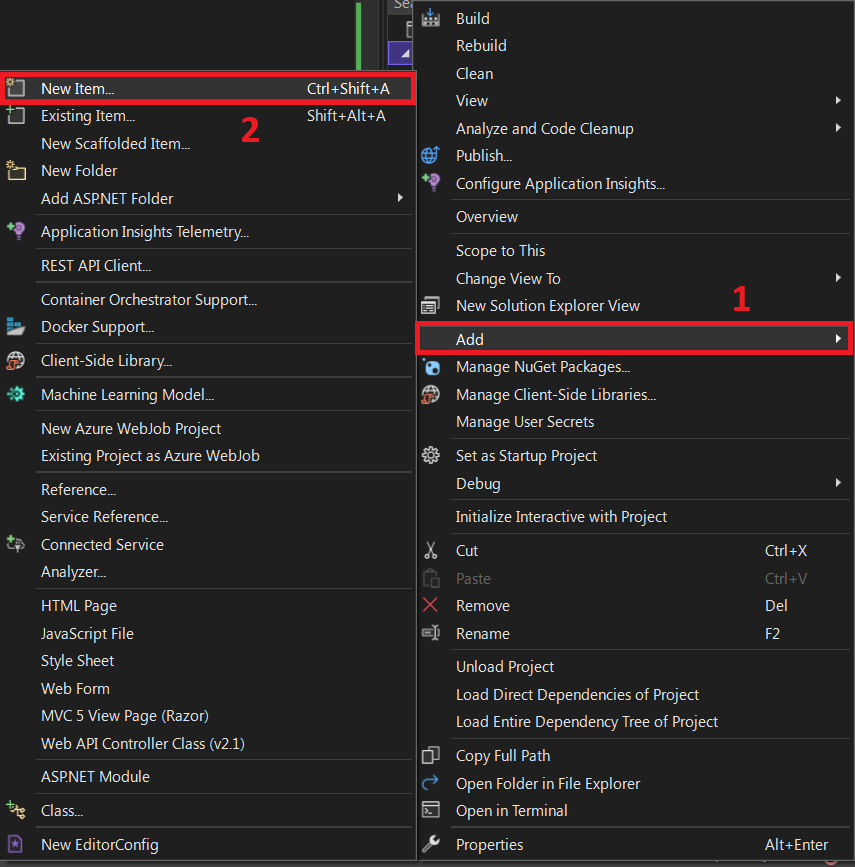
- Step 10: Add new item
Next, right click on your project name on the right side under solution explorer and click add then new item.

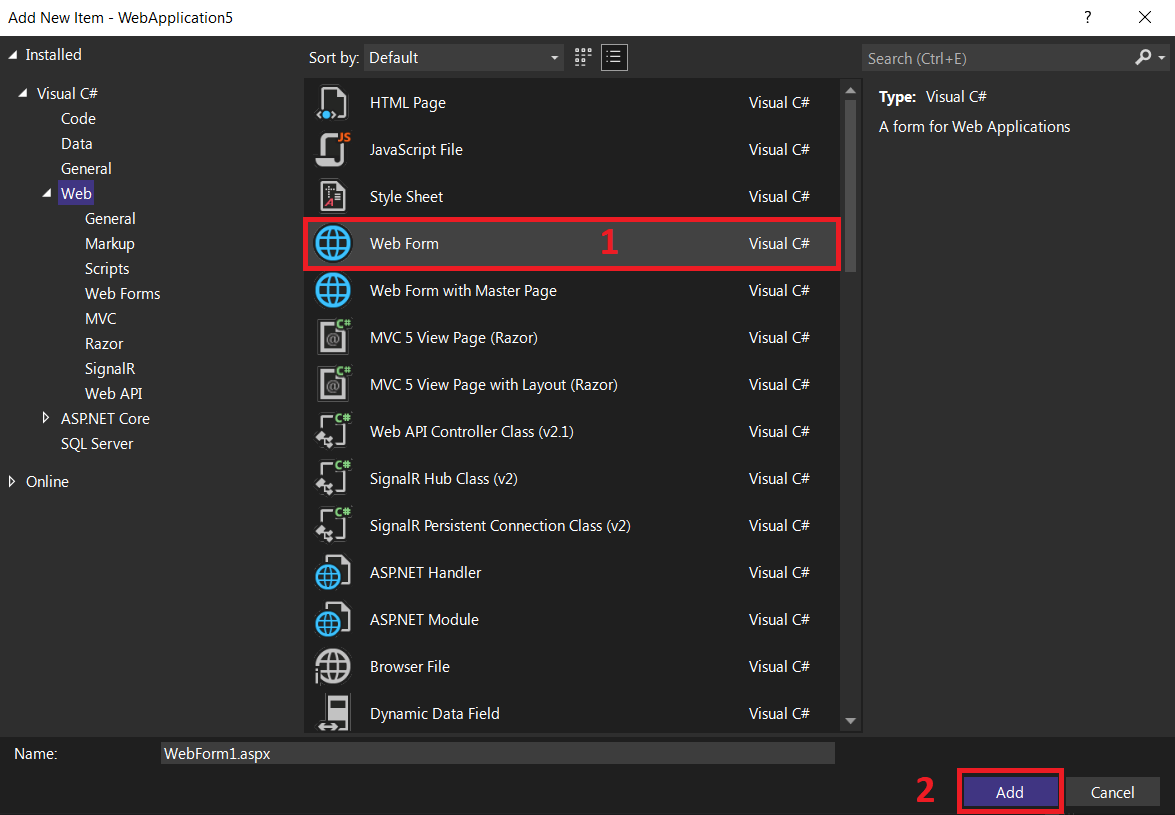
- Step 11: Select web form
Next, select web form the click add and name your form “Contact”

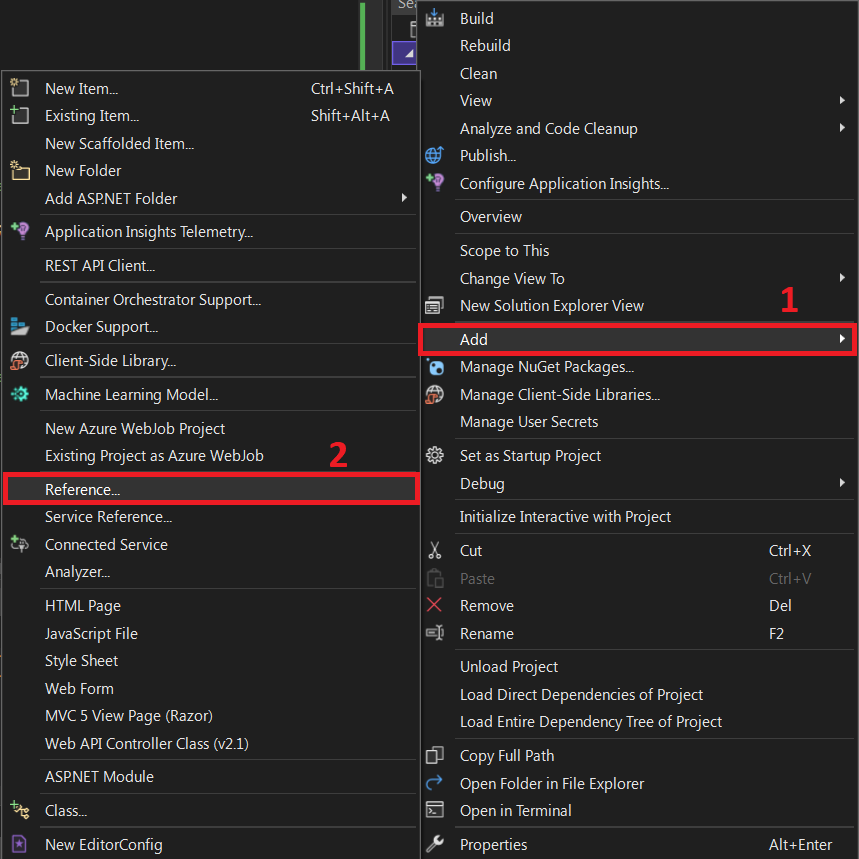
- Step 12 : Add reference
Next, right click the project in the solution explorer then click add the click reference.

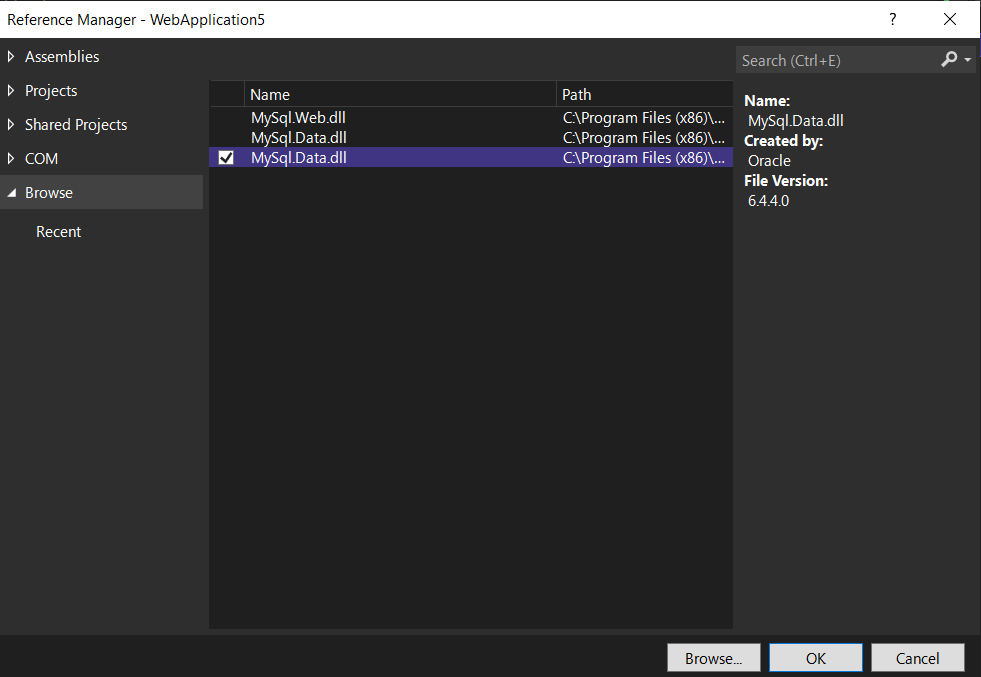
- Step 13: Add mysql.data.dll
Next, add mysql.data.dll then click ok.

- Step 14: Copy the code given
Final, copy all code given below and paste it to each designated file.

The code given below is the HTML form of the CRUD Operation
Here’s the code for the HTML form of the crud operation.
<%@ Page Language="C#" AutoEventWireup="true" CodeBehind="Contact.aspx.cs" Inherits="asp.netcrud.Contact" %>

<!DOCTYPE html>

<html xmlns="http://www.w3.org/1999/xhtml">
<head runat="server">
    <title></title>
</head>
<body>
    <form id="form1" runat="server">
    <div>
        <asp:HiddenField ID="hfContactID" runat="server" />
        <table>
            <tr>
                <td>
                    <asp:Label ID="Label1" runat="server" Text="Name"></asp:Label>
                </td>
                <td colspan="2">
                    <asp:TextBox ID="txtName" runat="server"></asp:TextBox>
                </td>
            </tr>
            <tr>
                <td>
                    <asp:Label ID="Label2" runat="server" Text="Mobile"></asp:Label>
                </td>
                <td colspan="2">
                    <asp:TextBox ID="txtMobile" runat="server"></asp:TextBox>
                </td>
            </tr>
            <tr>
                <td>
                    <asp:Label ID="Label3" runat="server" Text="Adddress"></asp:Label>
                </td>
                <td colspan="2">
                    <asp:TextBox ID="txtAddress" runat="server" TextMode="MultiLine"></asp:TextBox>
                </td>
            </tr>
            <tr>
                <td>

                </td>
                <td colspan="2">
                    <asp:Button ID="btnSave" runat="server" Text="Save" OnClick="btnSave_Click" />
                    <asp:Button ID="btnDelete" runat="server" Text="Delete" OnClick="btnDelete_Click" />
                    <asp:Button ID="btnClear" runat="server" Text="Clear" OnClick="btnClear_Click" />
                </td>
            </tr>
            <tr>
                <td>

                </td>
                <td colspan="2">
                    <asp:Label ID="lblSuccessMessage" runat="server" Text="" ForeColor="Green"></asp:Label>
                </td>
                <tr>
                <td>

                </td>
                <td colspan="2">
                    <asp:Label ID="lblErrorMessage" runat="server" Text="" ForeColor="Red"></asp:Label>
                </td>
            </tr>
            </tr>
        </table>
        <br />
        <asp:GridView ID="gvContact" runat="server" AutoGenerateColumns="false">
            <Columns>
                <asp:BoundField DataField="Name" HeaderText="Name" />
                <asp:BoundField DataField="Mobile" HeaderText="Mobile" />
                <asp:BoundField DataField="Address" HeaderText="Address" />
                <asp:TemplateField>
                    <ItemTemplate>
                        <asp:LinkButton ID="lnkView" runat="server" CommandArgument='<%# Eval("ContactID") %>' OnClick="lnk_OnClick">View</asp:LinkButton>
                    </ItemTemplate>
                </asp:TemplateField>
            </Columns>
        </asp:GridView>
    </div>
    </form>
</body>
</html>
The code given below is the back-end of the CRUD operation
Here’s the code for the back-end of the crud operation.
using System;
using System.Collections.Generic;
using System.Data;
using System.Data.SqlClient;
using System.Linq;
using System.Web;
using System.Web.UI;
using System.Web.UI.WebControls;

namespace asp.netcrud
{
    public partial class Contact : System.Web.UI.Page
    {

        SqlConnection sqlCon = new SqlConnection(@"Data Source=LAPTOP-AMM1MQ8C;Initial Catalog=ASPCRUD;Integrated Security=true;");
        protected void Page_Load(object sender, EventArgs e)
        {
            if (!IsPostBack)
            {
                btnDelete.Enabled = false;
                FillGridView();
            }
        }

        protected void btnClear_Click(object sender, EventArgs e)
        {
            Clear();
        }

        public void Clear()
        {
            hfContactID.Value = "";
            txtName.Text = txtMobile.Text = txtAddress.Text = "";
            lblSuccessMessage.Text = lblErrorMessage.Text = "";
            btnSave.Text = "Save";
            btnDelete.Enabled = false;
        }

        protected void btnSave_Click(object sender, EventArgs e)
        {
            if (sqlCon.State == ConnectionState.Closed)
                sqlCon.Open();
            SqlCommand sqlCmd = new SqlCommand("ContactCreateOrUpdate",sqlCon);
            sqlCmd.CommandType = CommandType.StoredProcedure;
            sqlCmd.Parameters.AddWithValue("@ConatctID",(hfContactID.Value==""?0:Convert.ToInt32(hfContactID.Value)));
            sqlCmd.Parameters.AddWithValue("@Name",txtName.Text.Trim());
            sqlCmd.Parameters.AddWithValue("@Mobile",txtMobile.Text.Trim());
            sqlCmd.Parameters.AddWithValue("@Address", txtAddress.Text.Trim());
            sqlCmd.ExecuteNonQuery();
            sqlCon.Close();
            string contactID = hfContactID.Value;
            Clear();
            if (contactID == "")
                lblSuccessMessage.Text = "Saved Successfully";
            else
                lblSuccessMessage.Text = "Updated Successfully";
            FillGridView();
        }

        void FillGridView()
        {
            if (sqlCon.State == ConnectionState.Closed)
                sqlCon.Open();
            SqlDataAdapter sqlDa = new SqlDataAdapter("ContactViewAll", sqlCon);
            sqlDa.SelectCommand.CommandType = CommandType.StoredProcedure;
            DataTable dtbl = new DataTable();
            sqlDa.Fill(dtbl);
            sqlCon.Close();
            gvContact.DataSource = dtbl;
            gvContact.DataBind();

        }

        protected void lnk_OnClick(object sender, EventArgs e)
        {
            int contactID = Convert.ToInt32((sender as LinkButton).CommandArgument);
            if (sqlCon.State == ConnectionState.Closed)
                sqlCon.Open();
            SqlDataAdapter sqlDa = new SqlDataAdapter("ContactViewByID", sqlCon);
            sqlDa.SelectCommand.CommandType = CommandType.StoredProcedure;
            sqlDa.SelectCommand.Parameters.AddWithValue("@ContactID", contactID);
            DataTable dtbl = new DataTable();
            sqlDa.Fill(dtbl);
            sqlCon.Close();
            hfContactID.Value = contactID.ToString();
            txtName.Text = dtbl.Rows[0]["Name"].ToString();
            txtMobile.Text = dtbl.Rows[0]["Mobile"].ToString();
            txtAddress.Text = dtbl.Rows[0]["Address"].ToString();
            btnSave.Text = "Update";
            btnDelete.Enabled = true;
        }

        protected void btnDelete_Click(object sender, EventArgs e)
        {
            if (sqlCon.State == ConnectionState.Closed)
                sqlCon.Open();
            SqlCommand sqlCmd = new SqlCommand("ContactDeleteByID",sqlCon);
            sqlCmd.CommandType = CommandType.StoredProcedure;
            sqlCmd.Parameters.AddWithValue("@ContactID",Convert.ToInt32(hfContactID.Value));
            sqlCmd.ExecuteNonQuery();
            sqlCon.Close();
            Clear();
            FillGridView();
            lblSuccessMessage.Text = "Deleted Successfully";
        }
    }
}
Download Source Code below!
Conclusion
Using the .Net Framework 4.7.2 and a code generation tool, we learned how to develop an ASP.NET Web application and link it to a SQL Server to execute basic CRUD tasks. I hope you found it beneficial. Please let us know what you think in the comments area below.
Related Articles
- Crud Operation in Javascript with Source Code
- Crud In Codeigniter Using Ajax With Source Code
- CRUD Operations In Java With Source Code
- CRUD App In Django With Source Code
- CRUD Operation In PHP With Source Code
- CRUD Operations In Python With Source Code
Inquiries
If you have any questions or suggestions about CRUD Operations in ASP net, please feel free to leave a comment below.