The Library Management System Project in Python is significant software that is used in school and college libraries for adding new books to the library, issuing books to students, and keeping track of returned books.
Both students and library managers can use the system to keep track of all the books available in the library. It allows both the administrator and the student to look for the book they want.
Project Details and Technology
| Project Name: | Library Management System Project in Python SQL |
| Abstract: | This Library Management System in Python keeps track of the books present in the library. It is an important piece of software which is a must at schools and colleges. |
| Language/s Used: | Python (GUI Based) |
| Python version (Recommended): | 3.8 or 3.9 |
| Type: | Desktop Application |
| Developer: | Source Code Hero |
| Updates: | 0 |
About Library Management System Project Python
The Library Management System Project with Coding in Python oversees all functions in the library.
This technology allows a person’s activities in the library to be automated. We will develop a library administration system that will handle a variety of library tasks. Let’s get started on this project.
Prerequisites
tkinter – Please run below command to install tkinter
pip install tkinterpillow – Please run below command to install tkinter
pip install pillowpymysql – Please run below command to install tkinter
pip install pymysqlCreate a Database and its Tables
Please run the below command to your phpmyadmin.
create database db1;
create table books(bid varchar(20) primary key, title varchar(30), author varchar(30), status varchar(30));
create table books_issued(bid varchar(20) primary key, issuedto varchar(30));
Library Management System Modules
| Modules | Details |
| main.py | which does function call to all other python files |
| AddBook.py | To add the book |
| ViewBooks.py | To View the list of books in the library |
| DeleteBook.py | To Delete a book from library |
| IssueBook.py | To Issue a book from library |
| ReturnBook.py | To Return a book to the library |
How To Create a Library Management System Project in Python With MySQL
We will create a library management system for this project that will assist us in completing various operations such as adding, issuing, and returning books.
It will also save the book’s issuance and return dates, as well as the fine if the book is not returned.
Additionally, the data of stored books can be modified and removed. Before beginning the project, you must first install Python.
Let’s start the detailed discussion of each and every file of our library management system python project:
1.) main.py
Importing the Modules – To use the Tkinter we need to import the Tkinter module. As stated above, we have imported each file so that we can make function calls from our main file.
from tkinter import *
from PIL import ImageTk,Image #PIL -> Pillow
import pymysql
from tkinter import messagebox
from AddBook import *
from DeleteBook import *
from ViewBooks import *
from IssueBook import *
Connecting to the MySQL Server – Now we will connect to the server with the correct credentials associated with the MySql server installed on our system.
mypass = "" #use your own password
mydatabase="db1" #The database name
con = pymysql.connect (host="localhost",user="root",password=mypass,database=mydatabase)
#root is the username here
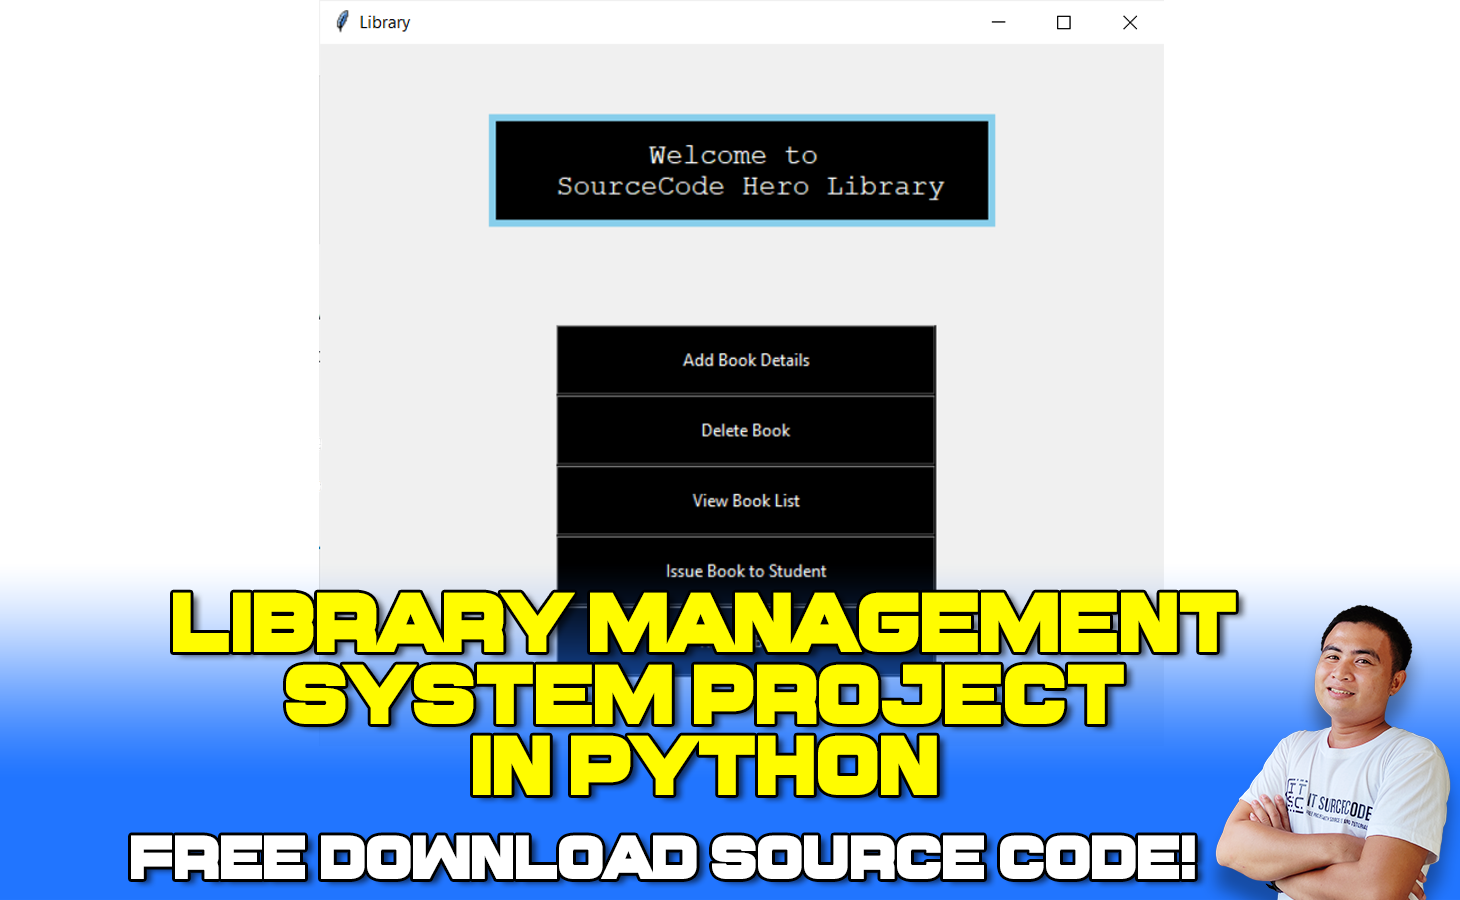
cur = con.cursor() #cur -> cursorDesigning the Window – Now we will design the project window and add a background image. Make sure to keep the image in the same directory as the project is in order to avoid discrepancies.
root = Tk()
root.title("Library")
root.minsize(width=400,height=400)
root.geometry("600x500")
Setting up the Head Frame – We create a frame that will hold our Label wiz headingLabel. We increase the size and alter the font by passing one more parameter in the Label method wiz font.
headingFrame1 = Frame(root,bg="skyblue",bd=5)
headingFrame1.place(relx=0.2,rely=0.1,relwidth=0.6,relheight=0.16)

headingLabel = Label(headingFrame1, text="Welcome to \n SourceCode Hero Library", bg='black', fg='white', font=('Courier',15))
headingLabel.place(relx=0,rely=0, relwidth=1, relheight=1)
Adding the Buttons – The below code adds buttons to the window frame.
btn1 = Button(root,text="Add Book Details",bg='black', fg='white', command=addBook)
btn1.place(relx=0.28,rely=0.4, relwidth=0.45,relheight=0.1)

btn2 = Button(root,text="Delete Book",bg='black', fg='white', command=delete)
btn2.place(relx=0.28,rely=0.5, relwidth=0.45,relheight=0.1)

btn3 = Button(root,text="View Book List",bg='black', fg='white', command=View)
btn3.place(relx=0.28,rely=0.6, relwidth=0.45,relheight=0.1)

btn4 = Button(root,text="Issue Book to Student",bg='black', fg='white', command = issueBook)
btn4.place(relx=0.28,rely=0.7, relwidth=0.45,relheight=0.1)

btn5 = Button(root,text="Return Book",bg='black', fg='white', command = returnBook)
btn5.place(relx=0.28,rely=0.8, relwidth=0.45,relheight=0.1)
root.mainloop()
AddBook Details :
btn1 stores the button created on root with text = ‘AddBook Details’. As soon as someone clicks this button, we call the function addBook defined in the AddBook.py. We call a function by specifying the command parameter equal to the name of the function.
We place this button using the .place() method by defining the position as well as the dimensions of the button.
Similarly, we define other buttons using the Button method and keep placing them by making minor changes in the rely parameter. You can notice that we are increasing it by 0.1 every time we define a new button.
Output

2.) AddBook.py
Importing the necessary modules
from tkinter import *
from PIL import ImageTk,Image
from tkinter import messagebox
import pymysql
Function – bookRegister() – This function executes an SQL command to insert data into the table and commit the changes.
def bookRegister():

    bid = bookInfo1.get()
    title = bookInfo2.get()
    author = bookInfo3.get()
    status = bookInfo4.get()
    status = status.lower()

    insertBooks = "insert into "+bookTable+" values ('"+bid+"','"+title+"','"+author+"','"+status+"')"
    try:
        cur.execute(insertBooks)
        con.commit()
        messagebox.showinfo('Success',"Book added successfully")
    except:
        messagebox.showinfo("Error","Can't add data into Database")

    print(bid)
    print(title)
    print(author)
    print(status)
    root.destroy()
We fetch the data in the input field by .get() method. Hence after fetching each of the data fields value we are ready to execute an SQL command to insert the data.
Function – addBook() – This function connects to the MySql server and creates a window for accommodating new text fields. We fetch details of a new book from the user and then call the bookRegister() function to register the books into the table.
def addBook():

    global bookInfo1 ,bookInfo2, bookInfo3, bookInfo4, Canvas1, con, cur, bookTable, root

    root = Tk()
    root.title("Library")
    root.minsize(width=400,height=400)
    root.geometry("600x500")
    mypass = ""
    mydatabase="db1"
    con = pymysql.connect( host="localhost",user="root",password=mypass,database=mydatabase)
    cur = con.cursor()
    # Enter Table Names here
    bookTable = "books" # Book Table
    Canvas1 = Canvas(root)

    Canvas1.config(bg="#ff6e40")
    Canvas1.pack(expand=True,fill=BOTH)

    headingFrame1 = Frame(root,bg="#FFBB00",bd=5)
    headingFrame1.place(relx=0.25,rely=0.1,relwidth=0.5,relheight=0.13)
    headingLabel = Label(headingFrame1, text="Add Books", bg='black', fg='white', font=('Courier',15))
    headingLabel.place(relx=0,rely=0, relwidth=1, relheight=1)
    labelFrame = Frame(root,bg='black')
    labelFrame.place(relx=0.1,rely=0.4,relwidth=0.8,relheight=0.4)

    # Book ID
    lb1 = Label(labelFrame,text="Book ID : ", bg='black', fg='white')
    lb1.place(relx=0.05,rely=0.2, relheight=0.08)

    bookInfo1 = Entry(labelFrame)
    bookInfo1.place(relx=0.3,rely=0.2, relwidth=0.62, relheight=0.08)

    # Title
    lb2 = Label(labelFrame,text="Title : ", bg='black', fg='white')
    lb2.place(relx=0.05,rely=0.35, relheight=0.08)

    bookInfo2 = Entry(labelFrame)
    bookInfo2.place(relx=0.3,rely=0.35, relwidth=0.62, relheight=0.08)

    # Book Author
    lb3 = Label(labelFrame,text="Author : ", bg='black', fg='white')
    lb3.place(relx=0.05,rely=0.50, relheight=0.08)

    bookInfo3 = Entry(labelFrame)
    bookInfo3.place(relx=0.3,rely=0.50, relwidth=0.62, relheight=0.08)

    # Book Status
    lb4 = Label(labelFrame,text="Status(Avail/issued) : ", bg='black', fg='white')
    lb4.place(relx=0.05,rely=0.65, relheight=0.08)

    bookInfo4 = Entry(labelFrame)
    bookInfo4.place(relx=0.3,rely=0.65, relwidth=0.62, relheight=0.08)

    #Submit Button
    SubmitBtn = Button(root,text="SUBMIT",bg='#d1ccc0', fg='black',command=bookRegister)
    SubmitBtn.place(relx=0.28,rely=0.9, relwidth=0.18,relheight=0.08)

    quitBtn = Button(root,text="Quit",bg='#f7f1e3', fg='black',       command=root.destroy)
    quitBtn.place(relx=0.53,rely=0.9, relwidth=0.18,relheight=0.08)

    root.mainloop()
Variables
bookInfo1 – contains book ID
bookInfo2 – contains Title of the book
bookInfo3 – contains Author of the book
bookInfo4 – contains status of the book (available or issued)
Con – MySql console
Cur – cursor of the console
Buttons
Submit – to commit the changes
Exit
We declare certain variables as global in order to use them in the bookRegister() function.
We create another window connected to the MySql server and pass on the cursor control to cur. It means that whatever we want to write on the MySql shell, we will do it through cur.
To commit(write changes in the table) the changes we will use con.
We draw the canvas and paint it with a good color. I have used Orange, you can use any color you like.
We create and place the headingLabel inside the headingFrame1 and give the title as “Add Books”.
The labelFrame basically creates a black box (in our case) to accommodate the input fields to fetch the book details.
We create and place a Label on our black box which displays the text ‘Book ID:’. Just after Label is placed we create and place the Entry box acting as our input field.
Similarly, we create and place input fields associated with labels: Title, Author, and Status.
In the end, we create a button to Finally.!! submit the details given by the user and a button to exit just in case the user did not intend to enter any details in library management.
As an action of a click on the SubmitBtn, we call the bookRegister() function to insert the details into the books table.
Output:

3.) ViewBooks.py
Importing the necessary modules
from tkinter import *
from PIL import ImageTk,Image
from tkinter import messagebox
import pymysql
Connection to MySQL server
mypass = ""
mydatabase="db1"
con = pymysql.connect( host="localhost",user="root",password=mypass,database=mydatabase)
cur = con.cursor()
# Enter Table Names here
bookTable = "books"
Function – View() – This function in our library project creates a window for displaying the records in the table.
def View():

    root = Tk()
    root.title("Library")
    root.minsize(width=400,height=400)
    root.geometry("600x500")
    Canvas1 = Canvas(root)
    Canvas1.config(bg="#12a4d9")
    Canvas1.pack(expand=True,fill=BOTH)
    headingFrame1 = Frame(root,bg="#FFBB00",bd=5)
    headingFrame1.place(relx=0.25,rely=0.1,relwidth=0.5,relheight=0.13)
    headingLabel = Label(headingFrame1, text="View Books", bg='black', fg='white', font = ('Courier',15))
    headingLabel.place(relx=0,rely=0, relwidth=1, relheight=1)
    labelFrame = Frame(root,bg='black')
    labelFrame.place(relx=0.1,rely=0.3,relwidth=0.8,relheight=0.5)
    y = 0.25
    Label(labelFrame, text="%-10s%-40s%-30s%-20s"%('BID','Title','Author','Status'),
    bg='black',fg='white').place(relx=0.07,rely=0.1)
    Label(labelFrame, text = "----------------------------------------------------------------------------",bg='black',fg='white').place (relx=0.05,rely=0.2)
    getBooks = "select * from "+bookTable
    try:
        cur.execute(getBooks)
        con.commit()
        for i in cur:
            Label(labelFrame,text="%-10s%-30s%-30s%-20s"%(i[0],i[1],i[2],i[3]) ,bg='black', fg='white').place(relx=0.07,rely=y)
            y += 0.1
    except:
        messagebox.showinfo("Failed to fetch files from database")

    quitBtn = Button(root,text="Quit",bg='#f7f1e3', fg='black', command=root.destroy)
    quitBtn.place(relx=0.4,rely=0.9, relwidth=0.18,relheight=0.08)
We create a new window to display the list of books and their status.
Just like we did in the previous file, we create a headingFrame and title it with a Label to display ‘View Books’.
Again we create a black box to accommodate the records returned by the getBooks query.
We manually display the names of the columns associated with our books table.
We execute the query stored in getBooks using cur.execute() display each record one by one as a Label. We place each Label You can notice that each time a record is displayed the value of y increases by ‘0.1’.
In order to handle any discrepancies, we place this code in a try-except block.
In the end, we create and place a button, quitBtn to exit from the current window of the library project.
Output:

4.) DeleteBook.py
Importing the necessary modules
from tkinter import *
from PIL import ImageTk,Image
from tkinter import messagebox
import pymysql
Connect to MySQL Server
mypass = ""
mydatabase="db1"
con = pymysql.connect (host="localhost",user="root",password=mypass,database=mydatabase)
cur = con.cursor()
# Enter Table Names here
issueTable = "books_issued"
bookTable = "books" #Book Table
Function – deleteBook() – This function primarily checks if the bid (book id) exists in the book table and if it does, it executes the necessary command to remove it.
def deleteBook():

    bid = bookInfo1.get()

    deleteSql = "delete from "+bookTable+" where bid = '"+bid+"'"
    deleteIssue = "delete from "+issueTable+" where bid = '"+bid+"'"
    try:
        cur.execute(deleteSql)
        con.commit()
        cur.execute(deleteIssue)
        con.commit()
        messagebox.showinfo('Success',"Book Record Deleted Successfully")
    except:
        messagebox.showinfo("Please check Book ID")

    print(bid)
    bookInfo1.delete(0, END)
    root.destroy()
We store the SQL query to delete the record in deleteSql. After that, we execute this command using cur.execute().
In case someone loses a book, we should delete that book from the issueTable in order to prevent discrepancies in the future. Hence we store the SQl query to delete the same record from the IssueTable in deleteIssue. We execute it along with the deleteSql.
Function – delete() – This function creates a window for accommodating a text input field. We fetch details of a book from the user and then call deleteBook() function to delete the book record from the table.
def delete():

    global bookInfo1,bookInfo2,bookInfo3,bookInfo4,Canvas1,con,cur,bookTable,root

    root = Tk()
    root.title("Library")
    root.minsize(width=400,height=400)
    root.geometry("600x500")
    Canvas1 = Canvas(root)
    Canvas1.config(bg="#006B38")
    Canvas1.pack(expand=True,fill=BOTH)

    headingFrame1 = Frame(root,bg="#FFBB00",bd=5)
    headingFrame1.place(relx=0.25,rely=0.1,relwidth=0.5,relheight=0.13)

    headingLabel = Label(headingFrame1, text="Delete Book", bg='black', fg='white', font=('Courier',15))
    headingLabel.place(relx=0,rely=0, relwidth=1, relheight=1)

    labelFrame = Frame(root,bg='black')
    labelFrame.place(relx=0.1,rely=0.3,relwidth=0.8,relheight=0.5)

    # Book ID to Delete
    lb2 = Label(labelFrame,text="Book ID : ", bg='black', fg='white')
    lb2.place(relx=0.05,rely=0.5)

    bookInfo1 = Entry(labelFrame)
    bookInfo1.place(relx=0.3,rely=0.5, relwidth=0.62)

    #Submit Button
    SubmitBtn = Button(root,text="SUBMIT",bg='#d1ccc0', fg='black',command=deleteBook)
    SubmitBtn.place(relx=0.28,rely=0.9, relwidth=0.18,relheight=0.08)

    quitBtn = Button(root,text="Quit",bg='#f7f1e3', fg='black', command=root.destroy)
    quitBtn.place(relx=0.53,rely=0.9, relwidth=0.18,relheight=0.08)

    root.mainloop()
Firstly, we create a new window and accommodate a headingFrame followed by creating the labelFrame to create and place a big black box.
This black box accommodates a Label and an Entry text field to take input of the Book ID.
After the black box, we create and place a Submit and Quit button associated with the names SubmitBtn and quitBtn respectively. A click on the Submit button triggers the deleteBook() function.
Moreover, we declare some variables as global, in order to provide their access in the deleteBook() function.
Output

5.) IssueBook.py
We create and place a headingFrame and two input fields for taking input of the desired books’ ID and issuers’ name.
After this, we created and added two buttons named issueBtn and quitBtn to facilitate the submission of our issue request and close the present window of the library management system respectively.
Output

6.) ReturnBook.py
We create and place a headingFrame and an input field for taking input of the books’ ID. Then, we create and add two buttons named SubmitBtn and quitBtn to facilitate submission of our return request and closing the present window respectively.
Output

By the way, if you are new to Python programming and you don’t have any idea what Python IDE to use, I have here a list of the Best Python IDE for Windows, Linux, and Mac OS for you.
Additionally, I also have here How to Download and Install the Latest Version of Python on Windows.
To start executing a Library Management System, make sure that you have installed Python on your computer.
Steps on how to run Library Management System Project in Python with Source Code
Time needed: 5 minutes
These are the steps on how to run a Library Management System Project in Python with Source Code
- Step 1: Download Source Code
First, find the downloadable source code below and click to start downloading the source code file.

- Step 2: Extract File
Next, after finished to download the file, go to file location and right click the file and click extract.

- Step 3: Open Project Path and Open CMD (Command Prompt).
Next, In order for you to run the project, you just need to open the project path and type CMD. The first thing you need to do is type py main.py in the command prompt. After that, just wait for a few seconds to load the system.


Download the Source Code below!
Summary
We created a library management system with a good user interface using Python and Tkinter.
This lesson divides the numerous tasks into different Python scripts to make things easier.
In the real world, we use similar techniques to make things easier to construct.
As a result, while creating a project, break your objectives into modules and merge them later.